CHAPTER 11. Airway Management
Michael Rouse and Michael Frakes
Competencies
1. Identify the indications for basic and advanced airway management.
2. Describe and use the universal emergency airway algorithm for airway management.
3. Identify the indications and contraindications for specific airway interventions.
4. Demonstrate the ability to perform alternative airway management.
5. Describe the pharmacology of advanced airway management.
Airway management is the first priority of patient care and often accounts for one of the most difficult clinical dilemmas encountered by transport personnel. The most common error in airway management is failure to anticipate the need for active intervention in patients at high risk for airway obstruction or respiratory insufficiency. Patients with a decreased level of consciousness, cardiopulmonary disease, head and neck injuries, and major traumatic injuries need quick decisive airway management, based on a sound knowledge of physiologic and anatomic principles, to prevent life-threatening complications during transport.
Many skills and much equipment are needed for control of the airway; however, the essential component of the airway management skill set is critical thinking. The transport team must know when to intervene, when not to intervene, how to intervene, and how to avoid complications. In addition to critical thinking, the competent transport team member must also possess the technical skill to perform an intervention when it is indicated. Critical thinking skills are developed through experience and practice. Technical performance is improved through advanced instruction and practice. Transport team members must be familiar with alternative airway options and their risks and benefits when deciding on a particular airway management technique.
Any vehicle used for patient transport may be an unfavorable environment for airway management. Noise, vibrations, sudden movements, inadequate lighting, lack of assistive personnel, limited access to the patient, and the inability to position the patient for better airway management are only a few of the reasons that airway management can be difficult in the transport environment. Failure of transport personnel to properly secure the airway before transport can lead to further respiratory decompensation, which can hasten systemic failure or produce an unmanageable transport in which safety may be compromised. Safety must never become a secondary consideration for the transport. Therefore, the airway must be fully controlled before critical care transport, even at the expense of additional time spent at the scene or referring institution. 50
This chapter describes assessment parameters, airway interventions, and methods of evaluation of the patient’s airway and ventilation during transport. Therapies to restore breathing and circulation are discussed in later chapters.
PATHOPHYSIOLOGY
Indications for Intubation
The multiple indications for initiation of airway management include apnea, airway obstruction, airway protection, respiratory insufficiency, foreign body obstruction, metabolic acidosis, and respiratory failure. 2,8,23,59,90 Also, at times, the decision to intubate is made without an obvious reason except the anticipation of a problem during transport. For example, the size of the transport vehicle may dictate that the patient has a secure airway before transport.
Invasive airway management can be beneficial for patients with hemodynamically unstable conditions. When a patient is in shock, an imbalance exists between oxygen supply and demand. Oxygen consumption increases linearly with work of breathing, and respiratory efficiency declines as work of breathing increases. External ventilator control can reduce that oxygen demand while providing direct airway access to increase oxygen delivery. 59 Particularly in patients with septic or hypovolemic shock, early intubation may be extremely beneficial. 90
Just as the transport nurse must maintain situational awareness by considering past events, the current situation, and likely future events, development of the patient care plan must also include determination of whether the need for airway intervention will develop over the course of the transport. The transport nurse must consider the likelihood of progressive obstruction from soft tissue swelling or the expansion of a hematoma or abscess, the likelihood of worsening oxygenation or ventilation, and the possibility of hemodynamic deterioration. Although airway procedures can clearly be performed in many transport vehicles, the procedures are also not possible in some; resource and access limitations can be associated with procedures performed in a transport vehicle instead of a healthcare facility. The transport team must factor those considerations into the pretransport care plan.
For the transport provider, patient and provider safety also sometimes necessitates airway intervention. In some environments, management of aggressive behavior with physical restraint may be appropriate, but the transport environment, and particularly the air transport environment, may necessitate the use of sedation so deep that it leads to respiratory depression or the inability to protect an airway.
The transport team should never ignore the competence that experience brings. Also, although intubation is a life-saving procedure, it is not without the potential for the development of serious complications. These complications include soft tissue injuries to the mouth, dental injury, vocal cord injury, tracheal or bronchial disruption, right mainstem intubation, aspiration, the development of a pneumothorax, esophageal intubation, and cardiac dysrhythmias. Complications can also occur with the use of neuromuscular blocking agents, anxiolytics, and sedative hypnotics that are used to facilitate intubation. 8,50,63
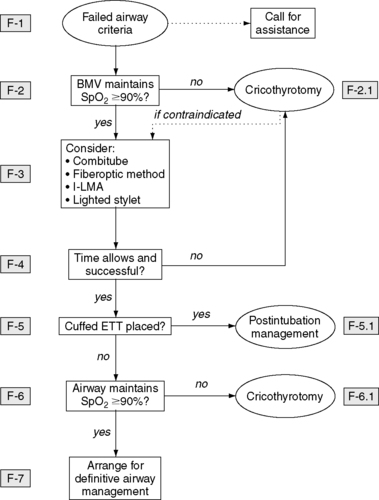
Much research on emergency airway management has been done during the last 20 years. In an effort to develop a fundamental approach to the emergency airway, the National Emergency Airway Management Course published emergency airway algorithms that use a clinical critical-thinking approach. The algorithms are intended as guidelines in the approach to the emergency airway. 8,93,94FIGURE 11-1, FIGURE 11-2, FIGURE 11-3, FIGURE 11-4 and FIGURE 11-5 contain the universal emergency airway algorithm, main emergency airway management algorithm, crash airway algorithm, difficult airway algorithm, and failed-airway algorithm. The different airway interventions that are presented in these algorithms are discussed throughout this chapter. These algorithms also provide a framework to develop quality management and research programs related to airway management in the transport environment.
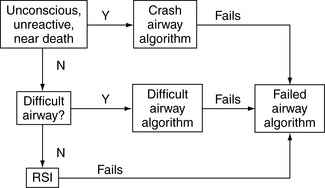 |
| FIGURE 11-1 Universal emergency airway algorithm. (Reprinted from Walls R, Luten R, Murphy M, editors: Manual of emergency airway management, a companion manual for the National Airway Management course, Philadelphia, 2000, Lippincott Williams & Wilkins, available at www.theairwaysite.com. Accessed June 30, 2008.) |
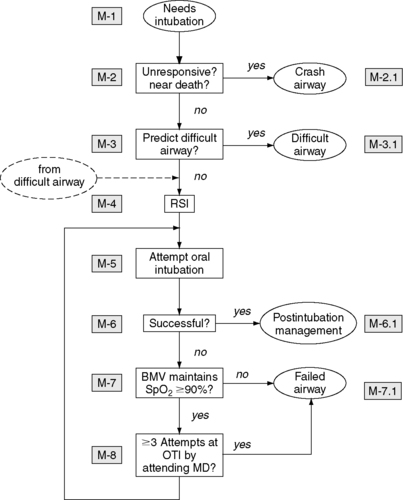 |
| FIGURE 11-2 Main emergency airway algorithm. (Reprinted from Walls R, Luten R, Murphy M, editors: Manual of emergency airway management, a companion manual for the National Airway Management course, Philadelphia, 2000, Lippincott Williams & Wilkins, available at www.theairwaysite.com. Accessed June 30, 2008.) |
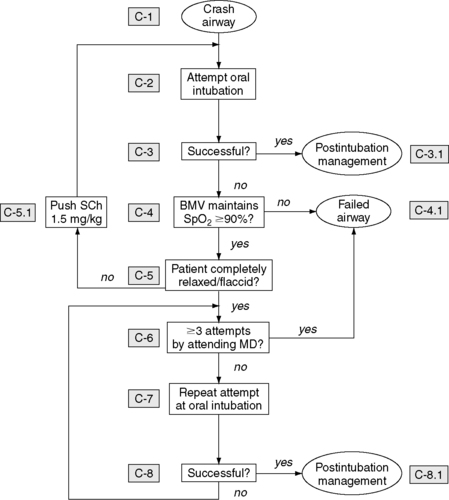 |
| FIGURE 11-3 Crash airway algorithm. (Reprinted from Walls R, Luten R, Murphy M, editors: Manual of emergency airway management, a companion manual for the National Airway Management course, Philadelphia, 2000, Lippincott Williams & Wilkins, available at www.theairwaysite.com. Accessed June 30, 2008.) |
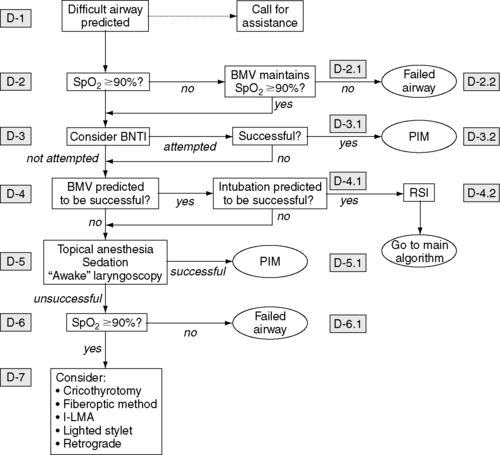 |
| FIGURE 11-4 Difficult airway algorithm. (Reprinted from Walls R, Luten R, Murphy M, editors: Manual of emergency airway management, a companion manual for the National Airway Management course, Philadelphia, 2000, Lippincott Williams & Wilkins, available at www.theairwaysite.com. Accessed June 30, 2008.) |
 |
| FIGURE 11-5 Failed airway algorithm. (Reprinted from Walls R, Luten R, Murphy M, editors: Manual of emergency airway management, a companion manual for the National Airway Management course, Philadelphia, 2000, Lippincott Williams & Wilkins, available at www.theairwaysite.com. Accessed June 30, 2008.) |
Selected Pathophysiology Related to Airway Management
Apnea can be the result of cardiac or traumatic arrest and is easily recognized and should be quickly treated. Initial basic airway management treatment begins with the insertion of an oral airway followed by adequate bag-valve-mask ventilations. This skill, although considered basic, requires maintenance of an adequate mask seal with one hand and provision of ventilations with the other. The mastery of bag-valve ventilation is the cornerstone of airway management and must be perfected by every emergency airway provider.
Upper airway obstruction in the trauma patient is usually caused by the tongue, teeth, or blood. In the nontrauma patient, excessive secretions place the patient at risk for serious aspiration and an edematous epiglottis may obstruct the upper airway. Airway protection must be considered for the patient with actual or potential emesis and active bleeding.
The management strategies for the treatment of traumatic brain injury (TBI) have changed significantly since the previous editions of this text. No longer are patients mildly hyperventilated in an effort to reduce intracranial pressure (ICP). The understanding now is that hyperventilation reduces ICP by causing cerebral vasoconstriction and a subsequent reduction in cerebral blood flow. Although early intubation to prevent the mortality that accompanies hypoxia is considered the standard of care for severe TBI, the effectiveness of this approach remains unproven. 8,90,93,94 Hyperventilation to a partial pressure of carbon dioxide in arterial blood (P aCO2) of 30 mm Hg in the patient with TBI today is reserved as a temporizing measure in patients with obvious clinical signs of herniation. Limiting the use of hyperventilation after severe TBI may help improve neurologic recovery after injury, or at least avoid iatrogenic cerebral ischemia. 8 The optimal CO 2 range appears to be 35 to 40 mm Hg or the lower limits of normocapnia. The use of quantitative capnometry can be a significant aid in confirmation of endotracheal tube placement but also aids in prevention of inadvertent severe hyperventilation in the patient with TBI. 8,24,26,33
Respiratory insufficiency may be traumatic or nontraumatic in origin and involves disease of the lower airways, where actual gas exchange takes place. Traumatic respiratory insufficiency may result, for example, from a flail segment or pulmonary contusion. Nontraumatic conditions that cause respiratory distress include pulmonary emboli, congestive heart failure, adult respiratory distress syndrome, and status asthmaticus. Impending or potential airway compromise may be the most difficult situation to ascertain. Consideration must be given to the history of illness or injury, therapies used to treat the patient before the arrival of the transport team, the patient’s response to the therapies, and transport time to the receiving agency. A situation in which a patient has sustained burn trauma with an inhalation injury and circumferential burns of the neck and chest should leave the transport team with little doubt of the need for airway control. However, the transport team frequently encounters situations in which the potential for airway compromise is not as obvious. In these circumstances, the transport team must rely on subjective and objective assessment parameters and past experience to guide their judgment.
ASSESSMENT
Assessment of the airway is a two-part process. The primary survey is quick and crude; the secondary survey is slower and more refined. The primary survey begins with assessment of airway patency. The ability of the patient to speak with a clear unobstructed voice is strong evidence of both airway patency and protection. However, in the patient who has lost protective airway reflexes, the assessment stops, and immediate action is taken to establish airway patency. During the secondary survey, the transport team must determine whether airway patency and an appropriate level of oxygenation can be maintained throughout transport; an altered level of consciousness may indicate hypoxia. If in doubt, the transport team must initiate appropriate interventions. Initially, the transport team assesses the patient by looking, listening, and feeling for spontaneous respirations. The mouth is opened and observed for obvious injuries and the presence of blood, teeth, the tongue, or foreign bodies obstructing the upper airway. The patient in the compensatory stage of shock may also have an increase in the rate, rhythm, and depth of respiration; pale, moist skin; and tachypnea and tachycardia caused by a stimulation of the sympathetic nervous system. Pallor, rather than cyanosis, is an indicator of shock for both adult and pediatric patients because sympathetic nerve stimulation causes blood to shunt from minor to major organs; the skin is considered a minor organ. Major organs are the heart and brain, and the body strives to maintain their oxygenation. The patient’s general appearance may also provide assessment data. The use of accessory muscles, nasal flaring, and the position the patient assumes should all be noted. The patient with hypoxia may attempt to sit upright and appear anxious and apprehensive and subjectively report shortness of breath.
The neck should be observed for obvious injuries that may produce an expanding hematoma, edema, or subcutaneous emphysema. The position of the trachea and presence of jugular vein distention should also be noted.
The purpose of auscultation is identification of the presence of absent, decreased, or adventitious breath sounds. Absent or decreased breath sounds may be present with a pneumothorax or hemothorax. Adventitious breath sounds are auscultated with obstruction of upper or lower airway structures.
The chest wall should be palpated for tenderness, crepitus, subcutaneous air, and symmetry of movement. Percussion is not a practical tool in the field at a noisy scene. However, in a quiet environment, percussion, like palpation, can provide excellent information about the status of the underlying thoracic structures. The normal lung sound is resonant, a hemothorax is dull, and a tension pneumothorax is hyperresonant.
The history of mechanism of injury or progression of illness may also provide subjective and objective data and assist the transport team in determination of a course of action.
Pediatric patients should be assessed in the same manner as adults. However, children do not have the chronic diseases of adulthood and therefore have more efficient compensation. To the untrained or unsuspecting eye, the child who appears to be in mild respiratory distress may be severely ill. (See Chapter 33 for discussion of the pediatric patient.) Recognition that bradypnea and bradycardia are critical signs of impending respiratory failure in the pediatric patient is essential. Primary cardiac arrest in children is rare. Cardiac arrest is usually caused by respiratory failure, and interventions to support respirations also sustain the cardiac system. Therefore, early and aggressive airway management for children is mandatory.
Children with respiratory insufficiency may show general signs and symptoms of fatigue, restlessness, irritability, and confusion and may cling to their parents with anxiety and apprehension. A weak cry is also typical. Observation may also reveal nasal flaring and substernal, supraclavicular, or intercostal retractions. Skin color is an excellent indicator of oxygenation in children; skin that is pale, has a capillary refill time of greater than 2 seconds, is mottled, or is cyanotic represents distress in the nontrauma patient. In the pediatric trauma patient, cyanosis may not be seen as a result of hypovolemia. Cyanosis is the result of desaturated hemoglobin. Active bleeding depletes the system of hemoglobin, and cyanosis is not observed. A fever may be present if the respiratory distress or failure is the result of an infectious process.
Auscultation may reveal expiratory grunting or wheezing and inspiratory strider. Upper airway problems usually involve a barking cough or strider, whereas wheezing and grunting breath sounds are associated with lower airway disease or obstruction. Diminished breath sounds may be present even in the face of a nontraumatic event.
Examination of the traumatized child may yield findings similar to those previously discussed. However, palpation, percussion, and a high index of suspicion are necessary for a thorough examination. The chest wall and mediastinal structures are more mobile in children than in adults. Children can withstand severe blunt chest trauma without sustaining rib fractures, but the heart and lungs may be severely contused. Likewise, the child with a tension pneumothorax may have a shift of the mediastinal structures much faster than an adult would. Interventions for the child with chest trauma are discussed subsequently. The transport team must recognize that any sign or symptom of respiratory compromise warrants aggressive airway management in children.
INTERVENTION
Basic Life Support Airway Interventions
In the patient with a history of trauma, all airway interventions must be performed with protection of the cervical spine. The airway should be opened, all blood or emesis suctioned, and foreign bodies removed. The need for ready access to a working suction machine throughout transport cannot be overemphasized. The tongue may be displaced from the oropharynx through placement of an airway adjunct or use of a modified jaw thrust. If the patient’s mandible is not intact, the tongue can be protracted directly with traction with a towel clip, suture, or clamp. When properly positioned, an oropharyngeal airway rests in the lower posterior pharynx. The oropharyngeal airway should be inserted with a tongue depressor. Proper position must be confirmed with assessment of airflow and efficacy of ventilation. An incorrectly placed oropharyngeal airway may worsen airflow or create an airway obstruction where none existed, created by the tongue being pushed posteriorly against the pharyngeal wall or the epiglottis being pushed against the laryngeal opening. The use of an oropharyngeal airway may induce vomiting in conscious patients; therefore, it should be used only in unconscious patients (Figure 11-6).
 |
| FIGURE 11-6 Insertion of oropharyhgeal airway. (From Lynn-McHale D, Carlson K, editors: AACN procedure manual for critical care, ed 4, Philadelphia, 2001, Saunders.) |
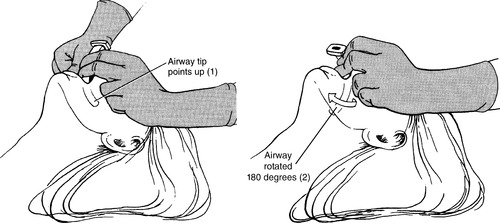
Nasopharyngeal airways may be used in patients with marginal stupor or coma who need assistance in maintaining an open airway. However, nasopharyngeal airways should be avoided for any patient with suspected head or facial trauma. Like that of the oral airway, the nasal airway’s tip lies in the posterior pharynx behind the tongue. Selection of the appropriate size of nasal airway is important because traumatic insertion may cause severe epistaxis or adenoid bleeding, especially in children. Lubricant use facilitates its insertion. The airway is inserted with the beveled edge along the nasal septum. When the left nostril is used, the nasopharyngeal airway must be inserted upside down to maintain the beveled edge against the septum and then rotated once the airway tip is in the posterior pharynx. If significant resistance is met, the other nostril should be tried. The appropriate size for both oral and nasal airways is obtained by means of comparison of the length of the airway device to the distance from the nares or mouth to the angle of the mandible (Figure 11-7).
 |
| FIGURE 11-7 Correct placement of nasopharyngeal airway. (From Proehl J: Emergency nursing procedures, ed 4, Philadelphia, 2009, Saunders.) |
In patients with intact airway reflexes, placement of either device may precipitate vomiting, gagging, or laryngospasm. Breath sounds must be assessed after placement to ensure airway patency has not been compromised, and likewise, head position must be optimized to ensure obstruction has not occurred. Where indicated, the cervical spine must be protected. The addition of a simple mechanical adjunct can maintain the patient’s airway and free the provider to perform other activities.
Ventilatory assistance must be initiated immediately for the patient with apnea and for the patient with severe hypoventilation. In preparation for intubation, respirations can be assisted with a bag-valve-mask device. Supplemental oxygen can be delivered through this device. The bag-valve-mask device with a reservoir can deliver a fractional concentration of oxygen in inspired gas (Fi o2) of 90% to 100% at flow rates of 10 to 15 L/min. For emesis to be immediately identified, all masks should be transparent, the airway should be promptly suctioned, and assisted ventilations should be resumed.
Bag-Mask Ventilation
Good bag-valve-mask skills are an essential competency for the transport nurse. Delivered tidal volumes vary with bag type, hand size, and patient body characteristics. The transport team must evaluate the effectiveness of bag-valve-mask ventilations, particularly single provider ventilations, and proceed to two-person bag-valve-mask technique if doubt exists as to the effectiveness of manual ventilations. The addition of an oral or nasal airway improves the effectiveness of manual ventilation, and placement should be considered a mandatory step in the process of using a bag-valve-mask on any patient in whom use is not contraindicated.
Important considerations in bag-mask ventilations are the quality of the mask seal and a patent airway. Patients with beards or who are edentulous present unique challenges to mask ventilations. The use of a water-soluble lubricant liberally applied to the mask area in contact with the beard surprisingly gives a much better seal in these patients. In patients who are edentulous, leaving the teeth in place to give the cheeks structure and then removing them just before intubation often aids ventilations. Lastly, the use of an oral airway should not be seen as a sign of weakness. It is an essential part of good masking skills and should be encouraged in patients who are deeply obtunded.
Often in obese patients, good valve-bag-mask skills are a team effort with one or two people maintaining a proper mask seal while another squeezes the bag reservoir.
In patients with hyperdynamic conditions, with high oxygen demands or poor oxygen delivery capabilities, hypoxia develops more quickly. Children normally have twice the metabolic demand for oxygen as do adults and have a smaller reserve capacity; desaturation can occur quickly, as with pregnant women and obese patients. Initially, evidence of good masking technique includes adequate chest rise. Pulse oximetry should be available to aid in oxygen desaturation detection, and if end-tidal CO 2 capnography is available, a regular waveform with exhalation should be noted.
The ability to perform advanced airway maneuvers must begin with knowledge of normal anatomy. Knowledge of the anatomic structures is especially important when structures are only partially visible or are displaced as a result of injury. Familiarity with the anatomic differences between the adult and child is equally important.
AIRWAY MANAGEMENT TECHNIQUES
The Larynx
Endotracheal intubation entails manipulation of the anatomy to allow passage of an endotracheal tube (ETT) through the larynx, either blindly or through direct visualization with a laryngoscope. An understanding of the relationship of the cartilages of the larynx and their relative positions helps with faster and more confident intubation.
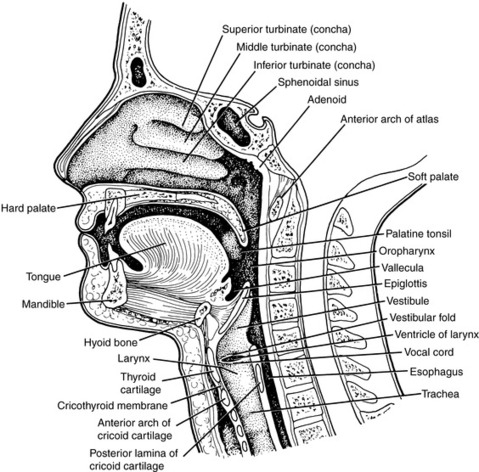
The larynx, or voice box, is an intricate arrangement of nine cartilages, three single and six paired, connected by membranes and ligaments and moved by nine muscles. From above, it attaches to the hyoid bone and opens into the laryngopharynx, and on the inside, it is continuous with the trachea. In an adult, it extends from the level of the fourth to the sixth cervical vertebrae.
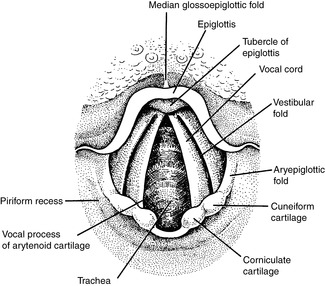
The three single cartilages form the basic boxlike structure of the larynx and provide the major external landmarks. The thyroid cartilage, commonly known as the Adam’s apple, is formed by the fusion of two curving cartilage plates and is typically larger in men than in women because of the growth-stimulating influence of male sex hormones during puberty. Manipulation of the thyroid cartilage can displace the vocal cords posteriorly and improve laryngeal visualization during laryngoscopy. The ring-shaped cricoid cartilage is sandwiched between the thyroid cartilage above the first tracheal ring. Because the cricoid cartilage is a complete ring, the tracheal diameter does not narrow during cricoid pressure. Pressure on the cricoid from the anterior neck, known as the Sellick maneuver, compresses the esophagus and may prevent passive regurgitation of stomach contents during laryngoscopy. The cricoid cartilage is connected to the thyroid cartilage by the cricothyroid membrane and is the desired location for a cricothyrotomy. The upper free edge of the cricothyroid membrane forms the vocal cords. Because of the attachment of the vocal cords to the cricoid ring, downward pressure on the cricoid ring may help to bring the vocal cords into view when they are hidden behind the tongue (the Sellick maneuver). The third single cartilage is the epiglottis, a spoon-shaped structure that lies directly over the glottic opening and prevents anything other than air from entering the tracheal inlet. The epiglottis is the major visual landmark for performance of tracheal intubation (Figures 11-8 and 11-9).
 |
| FIGURE 11-8 Laryngoscopic view of airway. (From Rosen P, et al: Emergency medicine: concepts and clinical practice, vol 1, ed 3, St Louis, 1992, Mosby.) |
 |
| FIGURE 11-9 Sagittal view of airway. (From Rosen P, et al: Emergency medicine: concepts and clinical practice, vol 1, ed 3, St Louis, 1992, Mosby.) |
The most important paired cartilages of the larynx are the arytenoids. The arytenoids are pyramid-shaped and anchor the vocal cords in the larynx. The vocal cords look pearly white because of their avascular nature. At rest, the vocal cords lie partially separated or abducted. Excessive secretions or aspiration stimulate the airway and activate the defense reflexes. Laryngospasm, or spasmodic closure of the vocal cords, is the most severe form of airway closure and can totally prevent ventilation and the passage of an ETT. If a tube is forced through the cords with excessive pressure, an arytenoid can be dislocated and permanent hoarseness can result. The remaining two pairs of cartilages, the cuneiform and corniculate, form the posterior wall of the larynx. Committing these structures to memory assists the laryngoscopist in quickly identifying the glottic opening; when the opening is obscured from view, the ETT can be steered into position with the structures in view as reference points.
Tracheal Intubation
Intubation of the trachea is considered the gold standard for artificial airway support. Tracheal intubation provides protection against aspiration, allows for controlled and precise ventilation, and provides a method of drug administration. In addition, intubation protects the airway in situations of progressive airway closure caused by epiglottitis, inhalation burns, soft tissue trauma or infections, and other obstructive conditions. In the broader world of medicine, endotracheal intubation is generally successful, with failure occurring in as few as one of 2000 elective general anesthesia cases. 5 Success rates in the emergency department are lower but still well over 97%. 8,41,45,71,81
Complications of oral and nasal endotracheal intubation can be both significant and disastrous (see Box 11-1). Unsuccessful intubation or a missed inadvertent esophageal intubation may lead to prolonged hypoxia and result in long-term injury or death. If the patient cannot be intubated, other means of oxygenation and ventilation must be substituted. Pulse oximetry during intubation can help prevent oxygen desaturation during multiple intubation attempts and should always be available. Intubation predisposes the patient to a number of harmful physiologic responses, including laryngospasm, bronchospasm caused by airway irritability or aspirated secretions, hypertension, and dysrhythmias unrelated to hypoxia. 8 In addition, the process of intubation increases the patient’s ICP. 40 Unrecognized right mainstem bronchus intubation is a complication that may lead to inadequate ventilation and left lung atelectasis.
BOX 11-1


 Get Clinical Tree app for offline access

Complications of Intubation
Early Complications That Occur During the Intubation Procedure
1. Neck
Cervical strain: subluxation/dislocation, fracture, and neurologic injury
2. Mouth
Soft tissue injury that results in abrasion and hemorrhage involving lips, tongue, buccal mucosa, and pharynx
Temporomandibular joint subluxation/dislocation
Dental injury
3. Airway/respiratory
Arytenoid: dislocation and avulsion
Vocal cord: spasm, avulsion, and laceration
Pyriform sinus perforation that results in pneumothorax and pneumomediastinum
Tracheal and bronchial rupture
Right mainstem bronchus intubation, with atelectasis and respiratory compromise
Bronchospasm
4. Gastrointestinal
Esophageal: intubation and perforation
Vomiting and aspiration
5. Cardiovascular
Hypertension, tachycardia, bradycardia, and dysrhythmias
Cardiac arrest and interruption of CPR
Late Complications That Occur After Tube Is in Place
1. Airway/respiratory
Tube obstruction: secretions, blood, and kinking
Accidental extubation and endobronchial intubation
Vocal cords: ulceration
Trachea: ulceration, ischemic necrosis, and paralysis
Pneumothorax and pneumomediastinum
Aspiration and atelectasis
Cough that results in increased intrathoracic, intracranial, and intraocular pressures
2. Gastrointestinal
Esophageal intubation
Tracheoesophageal fistula
3. Cardiovascular
Tracheoinnominate artery fistula
4. Infections
Sinusitis, pneumonia, tracheobronchitis, mediastinitis, and abscess
5. Tube dislodgment
From Walls R, editor: Emergency airway management, Philadelphia, 2000, Lippincott Williams & Wilkins; and Dauphinee K: Orotracheal intubation; nasotracheal intubation, Emerg Med Clin North Am 6(4):7110, 1988.
Orotracheal Intubation
Orotracheal intubation is the most common method of airway management for all age groups. In children, orotracheal intubation is used almost exclusively. It is a safe procedure that involves psychomotor skills that are easily mastered. Few, if any, true contraindications to orotracheal intubation exist in the emergency setting. However, during circumstances in which major facial and neck trauma prevents recognition of landmarks or during isolated mandibular trauma in which the temporomandibular joint may be immobile, the orotracheal route becomes much more difficult and may necessitate a surgical airway. Other conditions that might dictate a surgical airway include circumstances in which significant bleeding is found in the oral pharynx or supraglottic area and patients with epiglottitis in whom landmarks are obscured or passage of a tube is impossible. Again, these conditions are considered relative, not absolute, contraindications.
At one time, laryngoscopy was considered contraindicated in patients with known or suspected cervical spine injury. The safety of inline immobilization of the cervical spine performed by an assistant combined with a gentle laryngoscopy is well established. Intubation of such patients has been greatly aided with pharmacologic agents, which improve the ease of intubation and make it much safer for the patient. Trauma to the teeth, soft tissues of the mouth, posterior pharynx, or vocal cords caused by improper use of the laryngoscope blade or by forcing an endotracheal is a complication of oral intubation.
In the adult, the narrowest portion of the airway is the glottic opening, the space between the true vocal cords. In children, the narrowest portion is at the cricoid cartilage below the vocal cords. The larynx of the child is therefore considered to be cone shaped. Because of this cone shape, it is possible to see the tube pass through the vocal cords but be unable to pass the tube through the cricoid ring. If this situation occurs, the tube should withdrawn and a smaller tube chosen; an ETT should never be forced down a child’s airway.
Cormack and Lehane22 quantified the ability to visualize the glottic opening during laryngoscopy (Figure 11-10). In the Cormack Lehane scale, grade I is visualization of the entire glottic opening, grade II is just the arytenoids cartilages or posterior glottic opening, and grade III is only the epiglottis; with grade IV, only the tongue is visible. Grade I and II views are associated with high intubation success rates, and grade III and IV views are linked with lower success rates. Other operators simply describe the percent of glottic opening (POGO) that is visible during the laryngoscopy. 22,65
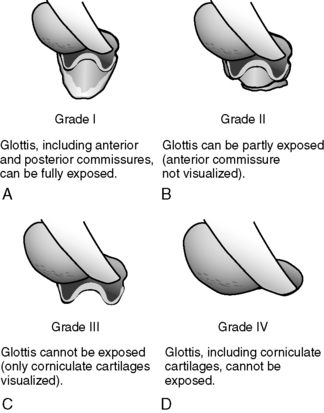 |
| FIGURE 11-10 Cormack Lehane scale for visualizing glottic opening during laryngoscopy. A, Grade I. B, Grade II. C, Grade III. D, Grade IV. (From Duchynski R, Brauer K, Jones S, et al: The quick look airway classification, Air Med J 17(2): 46-50, 1998.) |
The choice of blade, straight or curved, is left to the personal preference of the person performing the intubation. Blades come in curved shapes, such as the MacIntosh, or straight shapes, such as the Miller, Phillips, or Wisconsin. Generally speaking, the wide flange of the curved blade aids in controlling the tongue, considered the primary obstacle to intubation, better than the straight blade. The ability of the flanged curved blade to control the tongue also leaves more room on the right side of the mouth to manipulate the endotracheal blade into place. In addition, the curved blade follows the natural curvature of the anatomy better than the straight blade, which often must be inserted in a stepwise fashion of lifting, relaxing, and advancing. The straight blade, although more difficult for control of the tongue, has an advantage in viewing the glottic opening of patients who are considered to have an anterior positioned larynx. Such is the case in pediatric patients, patients with receding chins, and patients with short muscular necks. In these patients, the larynx is located more forward, and curved blades often do not provide an adequate view. The difficulty with use of the straight blade is that the rounded barrel shape of the blade is less optimal at controlling the tongue. If the laryngoscopist secures a good view of the cords without totally maintaining the tongue to the left of the blade, the tongue may lap over the blade and prevent manipulation of the tube through the cords. The laryngoscopist’s attention may be so focused on the cords as to not notice that the tongue is thwarting efforts at the level of the mouth.
The adult-size blade is a no. 3 or 4. The curved tip of the MacIntosh is inserted into the vallecula, the space between the base of the tongue and the pharyngeal surface of the epiglottis. Lifting the blade lifts the epiglottic ligament and indirectly lifts the epiglottis to expose the larynx. The straight Miller blade is passed so that the tip lies beneath the laryngeal surface of the epiglottis. The epiglottis is then directly lifted to expose the vocal cords. Steps for orotracheal intubation are included in Box 11-2.
BOX 11-2
Steps for Orotracheal Intubation
1. Position the patient. Nontrauma patient: Flex the neck forward and extend the head backward, creating a sniffing position. Trauma patient: Maintain in-line traction.
2. Preoxygenate the patient.
3. Hold the laryngoscope in the left hand, and open the patient’s mouth with the right hand.
4. Insert the blade into the right side of the mouth, sweep the tongue to the left, and advance to the appropriate landmarks. The Miller (straight) blade tip goes beyond the epiglottis; the MacIntosh (curved) blade tip enters the vallecula.
5. Pull the laryngoscope blade at a 45-degree angle; avoid twisting the laryngoscope handle. Visualize the epiglottis and vocal cords. Apply cricoid pressure.
6. Insert the ETT from the right corner of the mouth, and watch the tube pass through the vocal cords. Use the largest tube possible. Remove the stylet.
7. Inflate the tube cuff with 5 to 10 mL of air or to minimal occluding volume. (Minimal occluding volume is determined by placing the hand over the mouth and noting cessation of air leak with ventilation.) Capillary flow pressure in the tracheal mucosa is approximately 25 mm Hg, so cuff pressure should be less than that.
8. Confirm tube placement by auscultating bilateral breath sounds over the chest and axilla and by noting a lack of gurgling over the epigastrium. Observe for symmetry of chest wall motion. For a child, observe the cardiac monitor for the maintenance of an appropriate pulse rate and improvement in the patient’s color.
9. Secure the tube in place.
Selection of the appropriately sized tube is an important consideration in patient intubation. In general, the largest tube possible should be selected to minimize airway resistance, assist in suctioning, and minimize the need for excessive inflation of the tube cuff, which can cause mucosal damage. The cuff pressure should be at minimal occluding volume. At pressures greater than 25 mm Hg, mucosal ischemia starts to occur. A persistent air leak in the balloon is often caused by a faulty valve at the pilot balloon. To correct this condition without reintubation, the transport team member should attach a stopcock to the balloon, reinflate the balloon, and close the stopcock. 1 The average adult female airway can accommodate a 7-mm to 8-mm tube (the size refers to the inside diameter of the tube), and the average male airway, an 8-mm to 9-mm tube. The pilot balloon should be tested for leaks before insertion.
Preoxygenation is an important step that is frequently terminated prematurely. In the patient who is spontaneously breathing, the procedure requires an adequate seal on the face mask and use of a bag-valve-mask device with reservoir to deliver the highest Fi o2 for 3 to 5 minutes. If done correctly, preoxygenation washes out the nitrogen in the patients lungs and supersaturates them with oxygen, which allows for as much as 5 to 8 minutes of apnea. Another method of preoxygenation involves placement of a high flow mask on a breathing patient for, again, a period of 3 to 5 minutes. In the patient who needs ventilatory assistance, avoidance of peak airway pressures greater than 20 to 25 mm Hg aids in minimizing gastric distention, which increases the risk of vomiting leading to aspiration and hypoxia.
The BURP method is an additional maneuver to improve visualization of the glottis during intubation. The BURP method (Backward, Upward, Rightward, Pressure) involves pressure on the thyroid cartilage. When the laryngoscopic view is suboptimal, the assistant performing cricoid pressure may apply firm backward, upward, and rightward pressure on the thyroid cartilage to bring the glottic opening into view; or the laryngoscopist may perform the movement with a free right hand and, when the view is optimal, ask the assistant to hold the new found position. In this manner, the assistant performs both cricoid pressure and BURP maneuver to improve the view of the laryngoscopist and aid in prevention of stomach insufflation and regurgitation. When the laryngoscopist uses a hand to improve laryngeal visualization, the method is also referred to as external laryngeal manipulation (ELM) or optimal external laryngeal manipulation (OELM). 84
Gastric emptying ceases with significant trauma, and patients are considered to have a full stomach if they have eaten within 6 hours of trauma or anesthesia. The Sellick maneuver (digital pressure over the cricoid cartilage exerted posteriorly to compress the esophagus against the underlying vertebral body) is applied to prevent the regurgitation of gastric contents into the pharynx and subsequent aspiration into the pulmonary tree and is considered an integral part of rapid sequence tracheal intubation during emergency airway management. 30 Occasionally, cricoid pressure may improve visualization of the glottic opening by pressing the larynx downward and perhaps into the field of view. That cricoid pressure may worsen laryngeal view and reduce airway patency is also clearly understood. 30
If cricoid pressure is too great, or the pressure is over the thyroid cartilage and not the cricoid ring, it may prevent the passage of an endotracheal tube. This case is especially true in the pediatric patient because of the child’s pliable airway structures. If difficulty is encountered, the assistant should release part or all of the pressure. If the patient actively vomits, the assistant should immediately release the cricoid pressure and actively suction the patient’s airway.
Insertion of the tube through the relaxed cords should continue until the cuff is just past the cords. To ensure the tip of the tube is above the carina, the tube is placed so that the teeth are approximately at the 21-cm mark on the tube for women and at the 24-cm mark for men. A quick way to facilitate tube depth is to place the tube to a depth equal to three times the tube size. This formula works as well with pediatric tubes, provided the correct tube size is chosen. With completion of the intubation, the laryngoscope is gently withdrawn, the cuff is inflated with 5 to 10 mL of air, and placement of the tube is confirmed. Tube placement confirmation begins with auscultation of breath sounds in the right and left chest areas and over the stomach. A number of adjuncts are available to assist in confirmation of tube placement and are discussed later in this chapter.
Once intubation and oxygenation are complete, patients who were previously hypoxic may have an increased level of consciousness and may become combative. A patient’s first priority in this confusion is extubation. Soft restraints and a bite block may be in order. An oral airway may be used as a bite block to prevent the patient from biting down on the ETT. The bite block should be secured in place separately from the ETT. If the bite block and the ETT are secured together, the patient may inadvertently cause extubation by lodging the tongue behind the oral airway and pushing it and the ETT out.
Nasotracheal Intubation
Nasotracheal intubation is referred to as a blind procedure because the larynx is not visualized as in the orotracheal method. Once considered an ideal technique for intubation of the patient with suspected cervical spine injury, nasotracheal intubation technique has since been replaced with inline cervical immobilization together with rapid sequence intubation (RSI) and oral intubation. All blind techniques can produce airway trauma that includes laryngeal and glottic damage, esophageal intubation, and significant bleeding that leads to a “can’t ventilate, can’t intubate” situation. 18
Today, the nasotracheal technique has few true indications. In patients with spontaneous respirations and limited oral access, such as angioedema or other obstructive oral processes, nasotracheal technique with a cooperative patient and an experienced provider is a reasonable alternative to a surgical airway. 73 Other patients who might potentially benefit from a nasotracheal intubation include patients with severe dyspnea who cannot tolerate lying supine, such as those with pulmonary edema, congestive heart failure, or chronic obstructive pulmonary disease (COPD) exacerbation. Patients with dyspnea often have breath sounds that are easily heard and a glottis that tends to remain open, making nasotracheal intubation relatively easy provided the patient is well prepared.
For successful performance of the blind method of tracheal intubation, the patient must have spontaneous respirations, although the use of a lighted stylet in an patient with apnea can facilitate the nasotracheal route. In addition to the patient having spontaneous respirations, the nasotracheal method also requires a relatively quiet environment, which could make a procedure at a noisy scene difficult. In general, the nasotracheal technique requires more time than the orotracheal technique but also offers some slight advantages over the orotracheal technique (Box 11-3).
BOX 11-3
Advantages of Nasotracheal Intubation Versus Orotracheal Technique
1. Tube is more easily secured and hence is less likely to be dislodged.
2. More comfort during awake intubation and on the patient awakening.
3. Easier insertion in a patient with impaired neck or jaw motion.
4. No danger of the patient biting the tube.
5. Facilitates surgery to the oral cavity.
6. Favored in patients in whom laryngoscopy is difficult or contraindicated.
7. Useful in patients in whom neuromuscular blockade is hazardous.
Modified from Walls R, et al: Manual of emergency airway management, Philadelphia, 2000, Lippincott Williams & Wilkins.
In trauma cases, the procedure can be performed with no movement of the cervical spine and can be performed on a patient who is sitting. Therefore, the nasotracheal method can be a useful procedure in the trauma patient who needs airway management but is still entrapped upright in a vehicle. Also, the patient cannot bite the tube, and the tube is easily secured in place. A disadvantage of blind nasal intubation is that any upper airway bleeding induced by this technique can obscure visualization during subsequent attempts at direct laryngoscopy should the blind technique fail.
The only absolute contraindication to the standard blind nasotracheal technique of intubation is apnea or near apnea. Other contraindications to nasotracheal intubation are considered relative, and they include: (1) a suspected basilar skull fracture (may risk cranial intubation) or other closed head injury58; (2) acute epiglottitis; (3) severe nasal or maxillofacial fractures; (4) upper airway foreign body, abscess, or tumor; and (5) anticoagulation therapy or other blood-clotting abnormalities that cause epistaxis. The disadvantages that are not contraindications to the procedure should be noted. Nasotracheal intubation puts the patient at risk for the development of meningitis or encephalitis. Special consideration must also be given to the patient for whom bacteremia would be detrimental, such as the patient with an immunocompromised condition or the patient with a cardiac valve abnormality or prosthesis.
The most common complication of nasotracheal intubation is hemorrhage. Traumatic intubation may cause epistaxis through abrasion of the nasal mucosa or rupture of a nasal polyp. Bleeding can be minimized with use of a tube 1 mm smaller than would be used orally and with the use of a vasoconstrictive agent to the nasal mucosa, such as topical phenylephrine. Oxymetazoline may also be used. It provides equally good vasoconstriction and can be used liberally without development of excessive hypertension in sensitive cardiac patients from mucosal absorption of phenylephrine. In addition, one should lubricate the tube well and avoid excessive pressure to help prevent excessive bleeding. The nasal passage may be gently dilated with successfully larger nasopharyngeal airways with 2% lidocaine lubricant applied to each airway. Some practitioners dilate the nasal mucosa with a gloved small finger. In the patient who is awake, administration of nasopharyngeal anesthesia with lidocaine or Cetacaine is also advisable, and 2% lidocaine gel may also be used to lubricate the tube. In children, the relatively large size of the tonsils and adenoidal tissue may produce severe bleeding if ruptured. Perforation and dissection of the posterior pharyngeal wall have also been reported. For these reasons, nasotracheal intubation in the child should only be attempted by an experienced and skilled provider. Steps for nasotracheal intubation are included in Box 11-4.
BOX 11-4
Steps for Nasotracheal Intubation
1. Assess nasal patency. Alternately occlude each naris, listen to air passage, and ask the patient or family members about past medical problems.
2. Anesthetize the nasal passage with lidocaine and a vasoconstrictor such as phenylephrine. Cetacaine to the posterior pharynx may also be used.
3. Position the patient. Nontrauma patient: May sit upright or assume a sniffing position with a bit less extension than for oral intubation. Trauma patient: Maintain in-line traction.
4. Provide supplemental oxygen.
5. Lubricate the tube liberally.
6. Introduce the tube perpendicular to the floor for the supine patient or to the bed for the upright patient.
7. Point the bevel of the tube toward the nasal septum. (If the left naris is used, the tube is inserted backward.)
8. Gently pass the tube and listen to breath sounds through the end of the tube as it is advanced. Occlusion of the opposite naris may make the breath sounds louder.
9. Just proximal to the glottis, the breath sounds become maximal. Take care not to touch the cords prematurely so as not to induce laryngospasm and cough.
10. Quickly advance the tube on inspiration into the trachea. An assistant should apply the Sellick maneuver (cricoid pressure) to help align the glottic opening.
11. Confirm the tube position by auscultating breath sounds and observing symmetric chest wall motion, and ensure that the patient is unable to speak.
12. Secure the tube in place.
The proper head position for the patient who undergoes nasotracheal intubation is the sniffing position with a bit less extension than when an oral intubation is performed. Extreme extension creates a more acute angle for the tube to pass through the larynx and makes the procedure more difficult. However, if cervical spine injury is suspected, the head and neck must be maintained in the neutral position. The beveled edge of the tube should be introduced against the nasal septum of the nostril chosen. The tube is advanced through the nose and into the pharynx with continuous forward pressure and gentle rotation. If the nasal passage appears to be obstructed, the other nostril may be used or the tube may be substituted with a smaller one. The tube must never be forced. The intubation specialist must listen and feel for air movement through the tube as the tube enters the pharynx and advances toward the glottis. Cricoid pressure may also be helpful. As the tube approaches the glottis, breath sounds are heard maximally. On inspiration, the tube is advanced through the cords. Tube position is then verified as described previously.
Several devices are available to aid placement of the nasotracheal tube. The Endotrol tube is specifically designed for nasotracheal intubation and for use in patients with an anterior larynx. The Endotrol tube has a ring on the upper portion that directs the tip anteriorly when traction is applied to the ring. Should cord spasm develop, a topical anesthetic may be sprayed onto the cords through the tube. Another device used to aid placement of the nasotracheal tube is the airway whistle or Beck Airway Airflow Monitor (BAAM). 18,19,31 The whistle is attached to the standard 15-mm endotracheal connector and amplifies the patient’s breathing as the tube is advanced through the posterior nasopharynx. As the tube is advanced further, the sound increases in intensity. Deviation from the airflow tract results in a decrease or loss of the whistle sound, which indicates the need for tube redirection. Once intubation is complete, the airway whistle is removed. 51 An air medical program evaluated the BAAM airway whistle and found that it was easy to use even in the noisy in-flight environment and had the added advantage of protecting the intubation specialist against contact with blood, vomitus, and sputum during the intubation procedure. A technique for use of the BAAM airway whistle combined with the controllable-tip ETT during blind oral intubation and digital intubation has also been described.
Digital Intubation
Digital intubation, or tactile orotracheal intubation, is another blind intubation technique that was the original method of intubation beginning in the mid 1700s. 2 With the invention of the laryngoscope, the technique became obsolete and is of limited usefulness in clinical practice. However, digital intubation can be helpful when other conventional methods have failed or in the prehospital setting where limited equipment, lighting, or space is problematic. The technique is useful in comatose patients with head and neck trauma, in obese patients or those with short muscular necks, and in patients with severe bleeding or excessive secretions that prevent direct visualization via laryngoscopy. The digital technique may also be useful in cramped spaces, such as ground or air ambulances in which space is limited, or in situations in which equipment such as a laryngoscope or suction apparatus is lacking or has failed.
Digital intubation requires that the patient be completely unconscious and that the mouth be opened widely without fear of the patient biting. This technique has been used with remarkable success in children and neonates, despite their small mouth openings. 3 It relies on the ability of the intubation specialist to guide the tip of the tube through the glottic opening with the middle and index fingers of the nondominant hand (Box 11-5). The primary limitation of this technique is the length of the intubation specialist’s fingers in relation to the patient’s oral and upper airway anatomy.
BOX 11-5
Steps for Digital Oral Intubation
1. Position the patient. Nontrauma patient: Flex the neck forward and extend the head backward, creating a sniffing position. Trauma patient: Maintain in-line traction.
2. Preoxygenate the patient.
3. Select the appropriately sized ETT in the usual manner. Insert an intubation stylet and bend the tube stylet in an open J configuration. Lubricate the tube.
4. Kneels or stand on either side of the patient at the level of the shoulders, facing the patient.
5. With gloved hands, insert the fingers of the nondominant hand along the patient’s tongue, pull the tongue forward, and walk the fingers down to palpate the epiglottis with the middle finger. If the epiglottis is not palpated, pull forward on the tongue.
6. The tube stylet is then slid along the left side of the mouth, with the medial aspect of the middle finger and the volar aspect of the index finger used to guide the tube tip in the direction of the epiglottis. Keep the index finger above the tube and the tube tip in contact with the middle finger.
7. Hold the tube against the epiglottis with the index finger, and slip the tube distally toward the glottic opening.
8. As the tube enters the glottic opening, resistance increases. At this point, hold the tube firmly and withdraw the stylet slightly. Advance the tube through the cords and then completely remove the stylet.
9. Confirm proper tube placement in the usual manner.
AIRWAY RESCUE DEVICES
Endotracheal Tube Introducer
MacIntosh, the British anesthesiologist who developed the MacIntosh blade, is credited with developing the endotracheal tube introducer (ETI) in the 1940s. 4 Later, it became known as the Eschmann Tracheal Tube Introducer, which remains available. And recently, a plastic disposable ETI became commercially available. Many anesthesia care providers consider the ETI the first choice in conditions where only the posterior arytenoids or the epiglottis are visualized during the intubation attempt.
The ETI is 60 cm long and is curved at a 35-degree at the end. The tip permits it to be steered behind the epiglottis and into the glottic opening. To use the ETI, perform laryngoscopy in the usual manner. Hold the ETI in the right hand and advance it toward the epiglottis, or where the cords are presumed. If the introducer goes blindly down the trachea, the laryngoscopist receives confirmation by way of feeling “clicks” as the curved tip of the introducer slides over the tracheal rings or “hold up” where the introducer reaches the carina or the right or left mainstem bronchus and cannot be further advanced. If the introducer is advanced without clicks or hold up, it has likely gone down the esophagus. This route is confirmed when the laryngoscopist literally realizes that the entire introducer has been inserted with only a few centimeters left in the hand. In this situation, pull back on the introducer until the curved tip is seen again and redirect it. 6
If hold up is noted, which may or may not be accompanied with clicks, it is nearly 100% confirmation that the introducer is in the trachea. Clicks are confirmed in 90% of tracheal intubations with the ETI. 4,5 Hold up may possibly occur in a patient with esophageal stenosis with a false-positive result or with cricoid pressure.
Once the intubation specialist is confident the ETI has entered the trachea, with positive hold up, click, or both signs, an assistant places a lubricated endotracheal tube over the introducer. The intubation specialist then advances the tube, similar to the Seldinger technique, over the introducer while holding the laryngoscope in the left hand. Maintaining the laryngoscope in place facilitates sliding the tube over the introducer. The assistant can stabilize the introducer by holding the free end above the endotracheal tube as the intubation specialist advances the endotracheal tube. At times, the endotracheal tube may resist passing through the cords. If this should occur, back the tube out slightly and rotate the tube 90 degrees to the left (the Murphy eye is now in the upright position), then advance. If this maneuver is unsuccessful, rotate the tube to the right 90 degrees and advance. In rare situations, the tube may need to be rotated 180 degrees to pass through the cords. Once the endotracheal tube passes through the cords, remove the introducer and confirm placement in the usual manner.
Lighted Stylet
An optional method of endotracheal intubation is the use of the lighted stylet. Referred to as the transillumination method, it uses a rigid wire stylet with a light bulb at the distal end and is powered by a small battery source in the proximal end. The technique relies on the transillumination of the neck tissue to guide the placement of the ETT. The lighted stylet was originally designed to aid in the blind nasotracheal method of intubation; however, design modifications have now been made to allow use in both orotracheal and nasotracheal methods and for pediatric use as well. The brighter transilluminated glow from the trachea is easily distinguished from the dull or absent glow should the esophagus be intubated. Medical personnel can also use the lighted stylet to accurately position the ETT of a patient with intubation by adjusting the stylet so that the transilluminated glow is at the level of the sternal notch. The tube is then slid to align proximally with a point that also aligns the light with the distal tip of the ETT (Box 11-6).
BOX 11-6
Steps for Use of the Lighted Stylet
1. Position the patient. Nontrauma patient: Flex the neck forward and extend the head backward, creating the sniffing position. Trauma patient: Maintain in-line traction.
2. Preoxygenate the patient.
3. The lighted stylet should be checked to ensure its light is bright enough by directly looking at the light. If the light is not uncomfortable to the eyes, it should be discarded and a new one used.
4. The lubricated stylet is inserted into a transparent ETT, and the light is positioned at the tip of the ETT, but not beyond.
5. The distal end of the ETT is then bent at a slightly greater than 90-degree angle.
6. The intubator kneels or stands on either side of the patient at the level of the shoulders, facing the patient.
7. For the oral technique, lift the tongue or the tongue and jaw, pulling the epiglottis anteriorly and clearing the supraglottic area for introduction of the tube stylet. Slide the tube down along the tongue, and lift the glottis in a “soup ladle” motion. For the nasal technique, use the lighted stylet with a directional tip tube such as the Endotrol tube. The tube stylet is inserted with the beveled edge against the septum after application of a topical anesthetic and phenylephrine.
8. As the tube stylet is advanced, observe for the transilluminated glow in the midline. If the tip is off midline, a dim glow is observed. If the glow is extremely dim or cannot be seen, the epiglottis has not been elevated and is probably covering the glottic opening. Correct by lifting forward on the jaw, tongue, or both.
9. When a bright midline glow is observed, the tube stylet is advanced until the glow is located at the sternal notch.
10. Carefully remove the stylet without dislodging the tube. Secure the tube.
11. Confirm proper tube placement in the usual manner.
The lighted stylet is most commonly used as a rescue tool where other more traditional airway management techniques have failed. An added advantage with the lighted stylet is that is does not require extension of the neck for proper placement. A number of studies indicate that learning to use the intubation stylet is easy when compared with direct laryngoscopy and associated with few complications. 28
Supraglottic Airway Devices
The past 15 years have seen propagation in airway devices that are designed to be inserted blindly, in circumstances of failed intubation, or in “can’t intubate, can’t ventilate” situations. All of these devices can trace their development to the late 1960s with the marketing of the esophageal obturator airway (EOA). The original EOA was a two-part device, a mask and tube, that required one person to maintain tight seal on the mask and a second person to provide ventilations. Eventually, the EOA was replaced by the esophageal tracheal combitube which remains an effective intermediate airway used primarily in the prehospital setting. Transport teams may encounter the Combitube, or any number of supraglottic devices in areas where medical personnel are not trained in endotracheal intubation techniques or when attempts at intubation are not successful. In addition, one of the following devices may likely be part of the transport team’s algorithm for failed intubation. Following is a review of some of the supraglottic airway devices in use today. Most of these numerous devices are fairly new and awaiting critical review. 34,76
Combitube
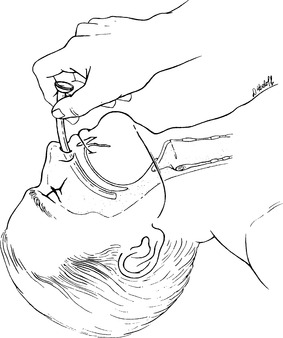
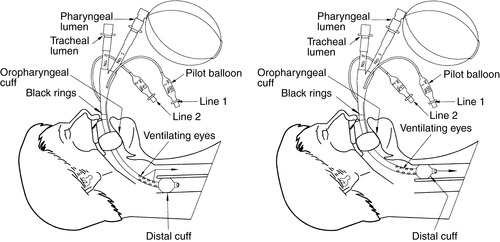
The Combitube is a double-lumen system that, when inserted blindly, allows for either tracheal or esophageal intubation without ventilatory compromise. During blind placement, the distal tube enters the esophagus approximately 98% of the time. Bending the Combitube at the pharyngeal portion between the cuffs for a few seconds, known as the Lipp maneuver, enhances the preformed curvature and eases insertion. 13 The Combitube incorporates a dual-cuff system that serves as airway seals. The distal balloon, which holds 12 to 20 mL of air, seals the esophagus and prevents gastric regurgitation or, in the event of tracheal intubation, aspiration. The proximal or oropharyngeal balloon is a high-volume cuff designed to be positioned between the base of the tongue and the soft palate so that the mouth and nasopharynx are sealed off and the escape of air through the mouth is prevented. The pharyngeal balloon may also tamponade oral bleeding and prevent aspiration of blood into the trachea. Tube 1 is always ventilated first, in confirmation of placement of the tube. The presence of breath sounds during lung auscultation and absence of gastric insufflation confirm esophageal position of the Combitube and ventilation should continue through the esophageal lumen. Use of a colorimetric end-tidal CO 2 detector can also aid in determination of which tube to ventilate. The stomach may occasionally harbor residual carbon dioxide from esophageal ventilation of expired air into the stomach during bag-valve-mask ventilations. For this reason, ventilation between 6 and 12 times is recommended before relying on a colorimetric CO 2 detector or electronic CO 2 detector to confirm proper ventilations. 6 If placement of Combitube results in failed ventilation, the most likely cause is that the perforated pharyngeal section has been placed too deep and is positioned in the esophagus. Pulling the Combitube back 3 to 4 cm usually corrects the situation.
The oropharyngeal balloon does not prevent aspiration of teeth or other oral debris, and the oropharyngeal balloon can migrate out of the mouth anteriorly, partially dislodging the airway. If blind insertion results in tracheal placement, the Combitube can be used as an endotracheal tube. 69,70
Esophageal tubes are contraindicated in patients who are awake and semiobtunded, in infants, in children, and in patients less than 120 cm in height. They cannot be used in patients with known esophageal injury or in situations of caustic ingestion. A criticism of the design is its potential complexity and confusion in use; however, numerous studies published since its introduction have indicated that the Combitube deserves strong consideration as a rescue airway and as a primary airway in certain clinical situations. 69,70Figure 11-11 illustrates insertion of the Combitube.
 |
| FIGURE 11-11 Insertion of combitube. (From Proehl J: Emergency nursing procedures, ed 4, Philadelphia, 2009, Saunders.) |
Classic Laryngeal Mask Airway
The classic laryngeal mask airway (cLMA) developed by a British anesthesiologist Archie Brain and introduced in 1988 was the first of the modern day supraglottic airway devices. The less expensive and disposable model of the cLMA is the laryngeal mask airway (LMA) unique. The device is designed to surround and cover the supraglottic area in appropriate sizes for all patients, including neonates to large adults. The LMA consists of an airway tube, a mask, and a mask inflation tube (Figure 11-12). The LMA provides for ventilation by forming a seal over the larynx above the cords. Two rubber bars cross the tube opening at the mask end to prevent herniation of the epiglottis into the LMA tube. The tip of the LMA rests in the top of the esophagus. The LMA is an excellent bridge device that allows ventilations in situations where mask ventilations are difficult, ineffective, or impossible. Typical first-time insertion success rates range between 90% and 95% if time for proper insertion is approximately 30 seconds. 11,60,91,99 The major disadvantage of the classic and unique LMAs is that they do not offer defense against regurgitation and aspiration and therefore the airway remains unprotected. Insertion of the LMA is shown in Figure 11-13. A concern for air transport teams is that a properly inserted and inflated LMA may undergo expansion of the cuff at altitude and result in overinflation unless properly monitored and corrected. 98
< div class='tao-gold-member'>
Only gold members can continue reading. Log In or Register to continue
Related posts:


Full access? Get Clinical Tree