Goals are to optimize wound strength, reduce inflammation, avoid infection, and minimize scar formation
 Time to wound cleaning is the most important factor
 To preserve viable tissue and restore continuity and function of tissue
CONTRAINDICATIONS
 Heavily contaminated wounds
 Presentation time for primary closure is after 12 hours for standard lacerations
 Presentation time for primary closure is after 24 hours for lacerations of the face, scalp, or other highly vascular areas
 Wounds under high tension should not be closed by skin adhesives alone
 Animal or human bite and most puncture wounds should not be closed on initial presentation
RISK/CONSENT ISSUES
 Cleaning and repair of wounds cause pain
 Local anesthetics are indicated for all wound repairs in conscious, alert patients
 Infection is always a risk in wound repair
 Wound repair always results in some scarring and can affect cosmetic appearance permanently
 Tendon, nerve, and vascular injuries can occur at time of initial injury or at time of repair
 Risk of retained foreign body exists despite best methods of foreign body identification and removal, such as local exploration, radiographs, ultrasonography, and irrigation
 Thorough exploration for foreign bodies must be performed and documented
 General Basic Steps
 Anesthetize wound
 Clean wound
 Explore wound
 Consider radiography
 Repair wound
TECHNIQUE
 Patient and Wound Preparation
 Position the patient to prevent falling or fainting during wound repair
 Practice universal precautions
 Prepare the surrounding skin with povidone–iodine solution and cover with sterile drapes before manipulation of any kind
 Local Anesthesia: Lidocaine (1% or 2%) with or without epinephrine
 Epinephrine is contraindicated in areas of high risk for ischemia, such as fingers, ears, nose, toes, and penis
 Use small-gauge needle (25 or 27 gauge) to directly inject into subcutaneous (SQ) tissue within the laceration
 To decrease pain, inject through the wound and not through the skin
 Use adequate amount for anesthesia but avoid high volumes that will lead to significant tissue distortion, possible cosmetic embarrassment, or systemic toxicity
 Maximum dose: 3 to 5 mg/kg 1% lidocaine, 7 mg/kg 1% lidocaine with epinephrine.
 Consider regional blocks for repairs in cosmetically important areas (face, hands, etc.) to avoid distortion of tissue
 Wound Cleansing
 Copious amounts of sterile water or sterile saline via high-power irrigation with a large syringe and splatter shield or an 18-gauge catheter. Tap water equally effective.
 Wound Exploration
 After cleansing, the true depth of the wound is appreciated
 Look for deeper tissue involvement and explore the wound
 If tendon or vascular structures are visualized, inspect through full range of motion, test for state of function, and document findings
 Radiography and/or Sonography
 If the possibility of underlying fracture and/or foreign body exists, image the affected area and document
 Select Method of Repair
 2-Octyl cyanoacrylate
 Staples
 Sutures
DERMABOND (LIQUID ADHESIVE)
 Indicated for simple wounds under low tension
 Advantages
 Ease of use, speed, and safety
 No return visit necessary (sloughs off in 5 to 10 days and serves as own dressing)
 Much less painful
 Disadvantages
 Moderate closure strength—cannot be used on joints or areas with high tension
 Cannot be used in areas with excessive hair
 Caution when using around eyes to prevent accidental runoff into eyes
 Equivalent tensile strength at 7 days when compared to sutures
 Procedure
 Clean the wound
 Approximate wound edges with forceps or fingers
 Apply three to four layers along the wound length or perpendicularly to it (as strips)
 Maintain manual support for 60 seconds
STAPLES
 Indicated for superficial scalp lacerations, linear lacerations on extremities, trunk, and wounds under low tension
 Advantages
 Ease of use, speed, and safety
 Easily removed and excellent tensile strength
 Disadvantages
 Less refined closure
 Possible greater scarring
 Uncomfortable removal (TABLE 69.1)
 No significant differences found with infection, healing, or patient acceptance when compared to suturing
SUTURE SIZE AND LOCATION |
Size | Superficial (nonabsorbable) | Deep (absorbable) |
2-0 | Suture chest tube |
|
3-0 | Foot | Chest, abdomen, back |
4-0 | Scalp, chest, abdomen, foot, extremity | Scalp, extremity, foot |
5-0 | Scalp, brow, mouth, chest, abdomen, hand | Brow, nose, lip, face, hand |
6-0 | Ear, lid, brow, face, mouth, nose |
|
 Procedure
 Anesthetize, clean, and debride wound as necessary
 If necessary, close deep fascia with absorbable sutures with a buried knot
 Evert wound edges before placing staple, if possible utilizing the services of an assistant with forceps. Do not press too hard.
 Allow the staple crossbar to sit 1 to 2 mm above wound edge
 Place enough staples to adequately appose tissue edges
SUTURES
 General Rules
 Deep stitches require 3-0 or 4-0 absorbable sutures
 Skin closure requires 4-0 or 5-0 nonabsorbable sutures
 Face, lips, and eyelid wounds: Consider 6-0 sutures
 High skin tension areas: Consider 3-0 or 4-0 sutures
 Always select the smallest size that will hold the skin edges together
 Nonabsorbable Sutures
 Silk: Has the best knot security, the best tie ability, the least tensile strength, and causes significant tissue reactivity. Used in intraoral mucosa.
 Ethilon: Has good knot security, good tensile strength, minimal tissue reactivity, and good tie ability. Best suited suture material for typical wound closure.
 Prolene: Poorest knot security, best tensile strength, least tissue reactivity, and fair tie ability
 Absorbable Sutures
 Vicryl: Good knot security, good tensile strength, minimal tissue reactivity, best tie ability, and 30-day suture duration. Used for deep repair to reduce wound tension.
 Surgical and chromic gut: Fair knot security, fair tensile strength, greatest tissue reactivity, poor tie ability, and 5- to 7-day suture duration. Used for intraoral wounds.
 Procedure
 Anesthetize, clean, and debride wound as necessary
 Prepare the skin with povidone–iodine or chlorhexidine solution
 Minimize trauma by handling skin with toothed forceps and by using small sutures
 Relieve tension by undermining with a scissor and by using layered sutures (FIGURE 69.1)
 Subcutaneous Layer Closure
 Reapproximate fascia as needed
 Close the SQ layer in sections, starting in the middle and then bisecting adjacent sections until adequate tension has been relieved from the skin edges
 Insert the suture at the bottom of the layer and draw it through to just beneath the dermis on the same side of the wound
 Reenter beneath the dermis on the adjacent side and draw through to the bottom of the SQ layer
 Tie the knot such that it remains at the bottom of the wound, thereby preventing a palpable knot near the skin surface
 Interrupted Stitch
 Most commonly used stitch. If one fails, the rest will maintain closure.
 Insert the needle at 90 degrees to the skin surface and include sufficient SQ tissue in the bite and carry the suture through to the opposite side
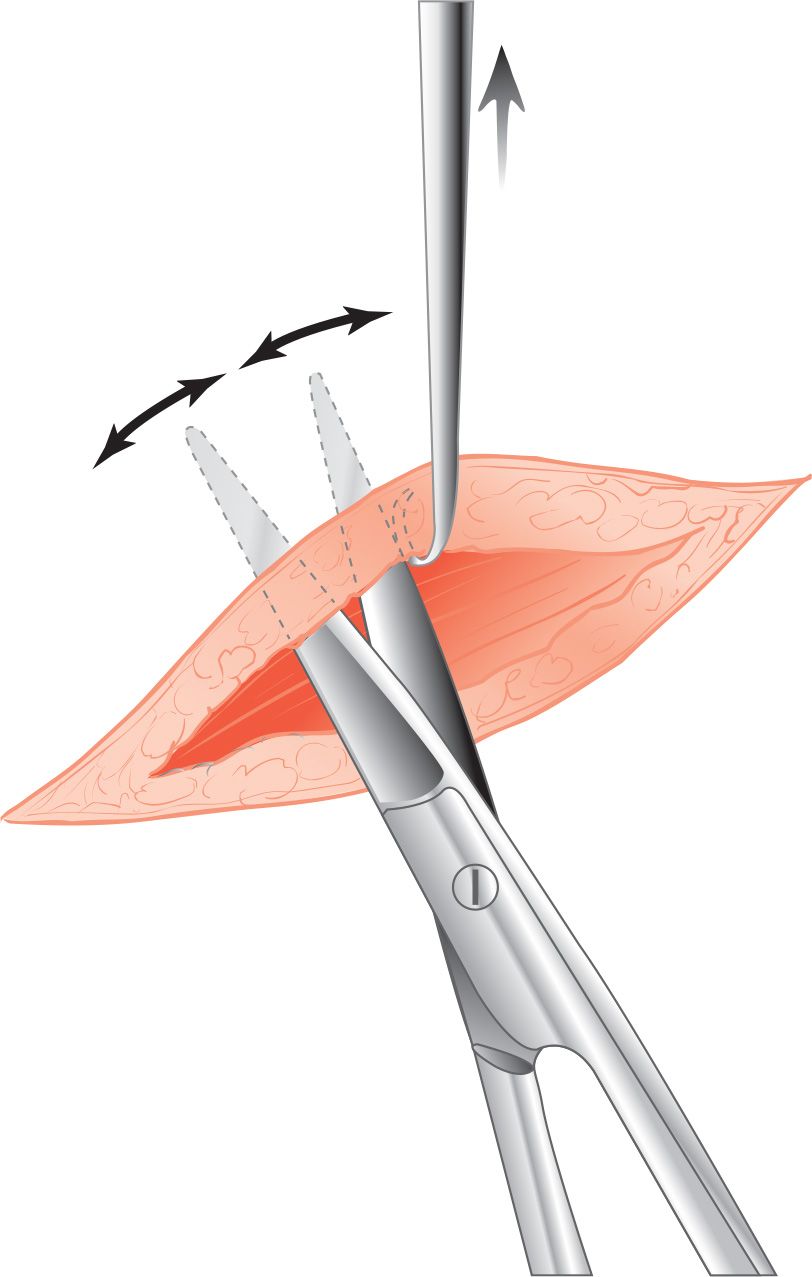
FIGURE 69.1 Undermining a wound reduces the degree of tension present after the repair. (From McNamara R, Loiselle J. Laceration repair. In: Henretig FM, King C, eds. Textbook of Pediatric Emergency Procedures. Philadelphia, PA: Williams & Wilkins; 1997:1152, with permission.)



Full access? Get Clinical Tree