Pediatric Airway Techniques
Robert C. Luten
Steven A. Godwin
INTRODUCTION
For the most part, the airway devices and techniques used in older children and adolescents are no different from those used in adults. The same cannot be said of small children (younger than 3 years) and infants (younger than 1 year), mostly related to two factors: the airway anatomy in these age groups is substantially different from the adult form, and some of the commonly used rescue devices are not available in pediatric sizes (e.g., Combitube). We limit our discussion to those rescue devices that are available for the pediatric population and that have evidence of successful use in children.
Mastering these techniques is straightforward and necessary if one is to manage the emergent pediatric airway. The following discussion describes the appropriate use of the various airway modalities in pediatrics, with emphasis on age appropriateness.
TECHNIQUES USED IN ALL CHILDREN
Bag-mask ventilation and endotracheal intubation
Refer to Chapters 9 and 12 for a detailed description of bag-mask ventilation (BMV) and endotracheal intubation. As in adults, oral and nasopharyngeal airways are important adjuncts to BMV, especially in small children in whom the tongue is relatively large in relation to the volume of the oral cavity. Recommendations and the rationale for the use of specific equipment (curved or straight blades, cuffed vs. uncuffed tubes) are described in Chapter 24. Use of size-appropriate equipment for pediatric airway management is critical to success, even in the most experienced hands. Proper BMV technique is particularly important in pediatric patients because the indication for intervention is most often primarily related to a respiratory disorder, and the child is likely to be hypoxic. In addition, pediatric patients are subject to more rapid oxyhemoglobin desaturation, so that BMV with cricoid pressure (Sellick maneuver) applied is frequently required during the preoxygenation and paralysis phases of rapid sequence intubation. Pediatric BMV requires smaller tidal volumes, higher rates, and size-specific equipment. The pediatric airway is particularly amenable to positivepressure ventilation, even in the presence of upper airway obstruction (see Chapters 24 and 26).
Tips for successful BMV ventilation in children
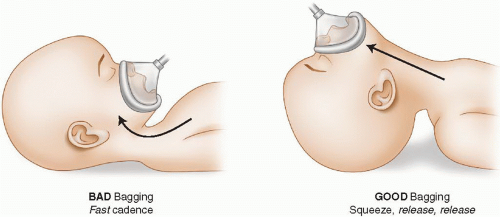
Although BMV in the pediatric population fails infrequently, attention to detail remains critical to success: the mask seal must be adequate, the airway open, and the rate and volume of ventilation appropriate to the patient’s age. Two errors of technique tend to occur. First, there is a tendency in the excitement of the situation to press the mask portion of the unit downward in an attempt to obtain a tight seal, resulting in neck flexion and upper airway obstruction. The head should be extended slightly rather than flexed thereby relieving, rather than producing, obstruction caused by the tongue and the relaxed pharyngeal anatomy (Fig. 25-1).
Second, there is a tendency to bag at an excessive rate. The cadence for bagging should permit adequate time for exhalation (actually repeating the words “squeeze, release, release” is helpful to assure adequate cadence). Textbooks recommend faster rates for smaller children. From a practical point of view, however, this cadence can be used for all ages. Always place an oral airway in the unconscious child before ventilating with a bag and mask because the pediatric tongue is large relative to the size of the oropharynx and is more prone to obstruct the upper airway.
The positioning described in the previous paragraph is usually obtained while applying the one-handed, C-grip technique to the mask. The thumb and index finger support the mask from the bridge of the nose to the cleft of the chin, avoiding the eyes. The bony prominences of the chin are lifted up by the rest of the fingers, placing the head in mild extension to form the sniffing position. Care is taken to avoid pressure on the airway anteriorly to prevent collapsing and obstructing the pliable trachea.
The two-handed technique can also be used. By opening the jaw slightly and pulling it forward, an obstruction may be relieved. The jaw can be moved further forward after opening the mouth slightly (“translating the mandible” forward; see Chapter 9), while using the thenar eminences of the palm to seal the mask on the face. A second provider squeezes the bag. If ventilation is not immediately facilitated with these maneuvers, positioning should be reassessed and a nasopharyngeal airway be placed to supplement the oropharyngeal airway.
Tips for succesful endotracheal intubation in children
Preintubation
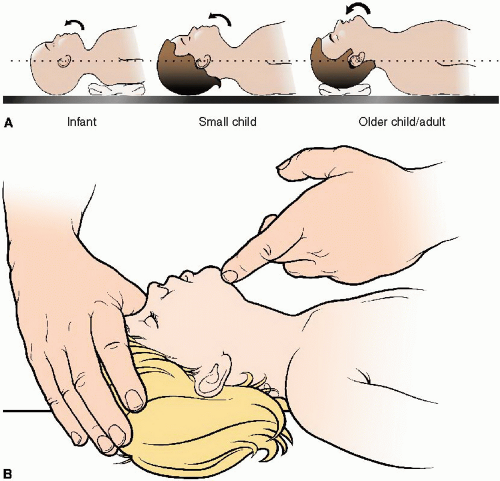
1. Position correctly: Proper positioning of the patient is key to prevent obstruction and provide optimal alignment of the axes of the airway. Optimal alignment of the laryngeal, pharyngeal, and oral axes in adults usually requires elevation of the occiput to flex the neck on the torso and extend the head at the atlanto-occipital joint. Because of the larger relative size of the occiput in small children, elevation of the occiput is usually unnecessary, and extension of the head may actually cause obstruction. Slight anterior displacement of the atlanto-occipital junction is all that is needed (i.e., pulling up on the chin to create the sniffing position). In small infants, elevation of the shoulders with a towel may be needed to counteract the effect of the large occiput that causes the head to flex forward on the chest. As a general rule, once correctly positioned, the external auditory canal should lie just anterior to the shoulders. Whether this position requires support beneath the occiput (older child/adult), the shoulders (small infant), or no support (small child) (Fig. 25-2A) can be determined using this rule of thumb. These are guidelines only, and each individual patient is different. A quick trial to find the optimal position may be of use. Figure 25-2B demonstrates the most common position for intubating the small child, the so-called sniffing position, and how this is achieved in a child of this size.
Even with optimal positioning, external manipulation of the airway (e.g., backward, upward (cephalad), and rightward pressure maneuver) may increase visualization of the glottis. This may be especially helpful in small children who have anterior airways, and trauma patients who cannot be optimally aligned.
2. Mark lip-to-tip distance with tape: The endotracheal tube (ETT) has centimeter markings along its length. The lip-to-tip distance is the the distance from the lip to a point half way between the vocal cords and the carina (i.e., midtrachea), which represents ideal positioning of the ETT in the trachea. Before a pediatric intubation, the ETT should be marked clearly with
tape at the appropriate lip-to-tip distance. This will serve to orient the intubator to the correct ETT insertion depth for this patient.
tape at the appropriate lip-to-tip distance. This will serve to orient the intubator to the correct ETT insertion depth for this patient.
Always select one tube size larger and one tube size smaller than the predicted tube size. Note all three tubes are taped at the same predicted lip-to-tip distance. The lip-to-tip distance is constant for a given patient and does not change if a smaller tube or larger tube is used.
As a rule of thumb, three times the chosen ETT size is used to estimate the lip-to-tip distance; for example, for a 3.5-mm ETT, the lip-to-tip distance would be 10.5 cm. Should a smaller tube actually be used because of a traumatized, narrowed glottic opening, recalculation of the lip-to-tip distance using the smaller diameter would result in an incorrect distance.
Direct Laryngoscopy
1. Look up and not more deeply: The pediatric airway lies higher in the neck than the adult airway. When doing direct laryngoscopy, the visual line of sight angle must be adjusted so that the intubator can look up


Full access? Get Clinical Tree


