Fig. 31.1
Anatomy of the infraclavicular area. Note that the brachial plexus passes under the approximate midpoint of the clavicle and then deep to the pectoralis major and minor muscle, medial and inferior to the coracoid process. (1) clavicle, (2) coracoid process and pectoralis minor (cut and reflected), (3) pectoralis major (cut and reflected), (4) thoracic cage, (5) intercostobrachial nerve (With permission from Danilo Jankovic)
The coracoid process of the scapula and the clavicle are the chief bony landmarks. The coracoid process lies superior and lateral to the course of the brachial plexus.
The brachial plexus runs in a line between the base of the interscalene groove and the axilla, and knowing this is helpful when trying to mentally visualize the location of the brachial plexus [4]. Note that the direction in which this line runs will differ depending on whether the arm is adducted or abducted (Figs. 31.2 and 31.3).
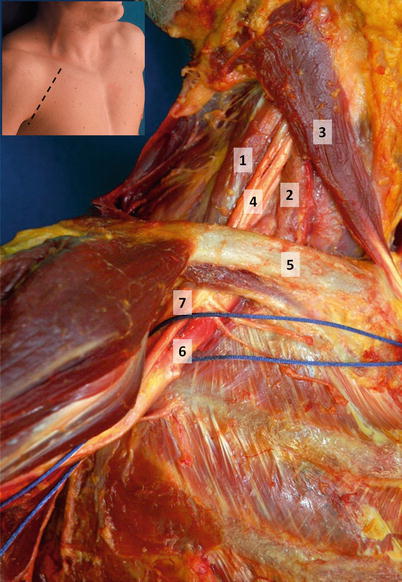
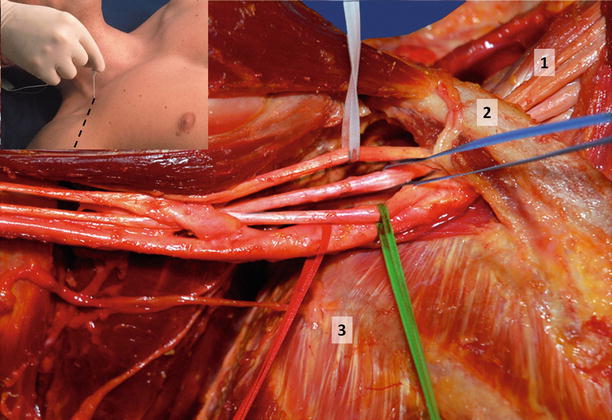

Fig. 31.2
The course of the infraclavicular brachial plexus with arm adducted at shoulder. The neurovascular bundle is encircled by the blue suture. Note that all the cords of the brachial plexus are clustered superolateral to the axillary artery in the medial portion of the infraclavicular fossa. (1) middle scalene muscle, (2) anterior scalene muscle, (3) sternocleidomastoid muscle, (4) trunks of the brachial plexus, (5) clavicle, (6) axillary artery, (7) cords of brachial plexus (With permission from Danilo Jankovic)

Fig. 31.3
Course of the infraclavicular brachial plexus with the arm abducted at the shoulder. Note that all the cords of the brachial plexus are clustered superolateral to the axillary artery in the medial portion of the infraclavicular fossa. Lateral cord (white), posterior cord (blue), medial cord (green), axillary artery (red). Note the relationship between the brachial plexus and the thoracic cage, which determines the relative risk of pneumothorax with more medial versus lateral approaches. (1) trunks of the brachial plexus, (2) clavicle, (3) thoracic cage of ribs and intercostal muscles (With permission from Danilo Jankovic)
It is important to appreciate that the orientation of the cords around the axillary artery varies with distance from the clavicle. As the brachial plexus emerges from under the clavicle, the cords are bunched together on the superior (cephalad) aspect of the artery. As the neurovascular bundle travels more distally, the cords gradually separate out and “spiral” around the axillary artery to eventually adopt the classically described position of lateral, posterior, and medial to the artery (Fig. 31.4). This arrangement is best appreciated when scanning the infraclavicular area with the arm abducted at the shoulder.
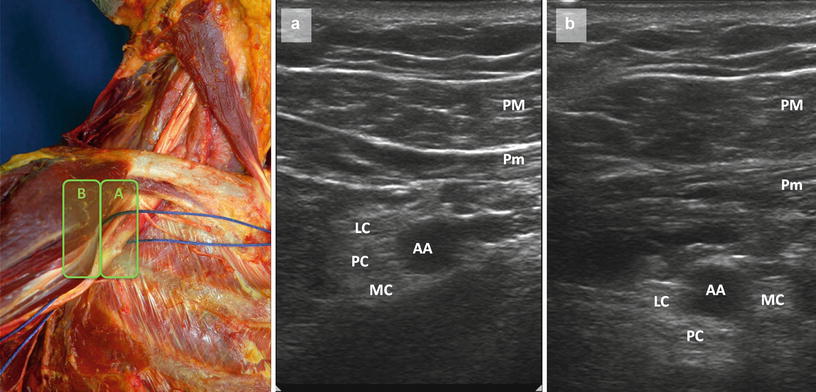

Fig. 31.4
Illustration of the variation in distribution of brachial plexus cords around the axillary artery (AA) depending on whether the probe is placed more medially (position A) or laterally (position B). In position A, the cords are clustered around the cephalad aspect of the artery and are often not distinguishable from each other. This view is usually only obtainable if the arm is abducted at the shoulder so that the clavicle moves up out of the way. In position B, the cords start to spread out around the artery. The lateral cord (LC) remains at the cephalad aspect of the artery, but the posterior cord (PC) and medial cord (MC) move into their classically described positions relative to the artery. PM pectoralis major, Pm pectoralis minor (With permission from Danilo Jankovic)
There is a fascial sheath around the neurovascular bundle that contains and directs the spread of local anesthetic. There is usually a fascial septum that separates the lateral cord from posterior and medial cord; piercing this septum is necessary to achieve the U-shaped local anesthetic spread posterior to the artery that is associated with block success [5] (Fig. 31.5). This also explains why obtaining a posterior cord motor response in the landmark-guided approach carries the highest success rates [6–9].
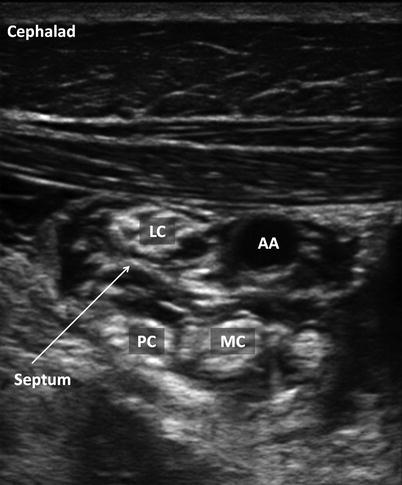

Fig. 31.5
Post-injection ultrasound image of the infraclavicular brachial plexus, illustrating the septum that separates the lateral cord (LC) from the posterior (PC) and medial (MC) cords. Our preference is therefore for a dual-injection technique, but there can be communication between the two compartments, and a single-injection posterior/deep to the artery (AA) may also suffice (Image courtesy of KJ Chin MPC)
Technique: Surface Landmark, Neurostimulation-Guided Approach, Single-Shot
Required Supplies and Equipment
Disinfectant solution and swabs for skin preparation
Sterile gloves and drapes
Short-beveled 22-G block needle with extension tubing
A 50-mm needle is suitable in slimmer patients, but an 80-mm needle may be necessary in patients with a thick chest wall.
Local anesthetic of choice in 10- or 20-ml syringes
Peripheral nerve stimulator
Lidocaine 1–2 % in 3-ml syringe with a 25–27-G hypodermic needle for skin infiltration (at operator’s discretion)
Equipment and supplies for managing life-threatening acute complications, including Intralipid for local anesthetic systemic toxicity
Drugs for intravenous sedation during the block (at operator’s discretion)
Preparation of Patient
Obtain informed consent for the block.
Explain expected clinical course including care of the insensate limb and managing the transition to systemic analgesia.
Establish intravenous access, supplemental oxygen delivery, and standard monitors (ECG, noninvasive blood pressure, pulse oximetry).
Perform a time-out to confirm patient identity and site and side of surgery.
Block Performance
Several slightly different surface landmark-guided techniques have been described, all of which use neurostimulation as the endpoint for nerve localization and injection. We recommend one of two techniques:
Landmark-Guided Infraclavicular Block: Coracoid (Wilson) Approach
Patient Position
The patient is placed supine with the operative arm adducted and if possible flexed at the elbow and placed on the patient’s abdomen to facilitate observation of motor responses.
It is recommended that the operator stands at the head of the patient, on the side to be blocked, as this makes it easier to observe and avoid inadvertent medial direction of the needle. However, the operator may also stand on the side of the patient if preferred.
Surface Landmarks
The coracoid process is palpated and marked.
A point 2 cm inferior and 2 cm medial to the coracoid process is marked—this is the site of needle insertion (Fig. 31.6).
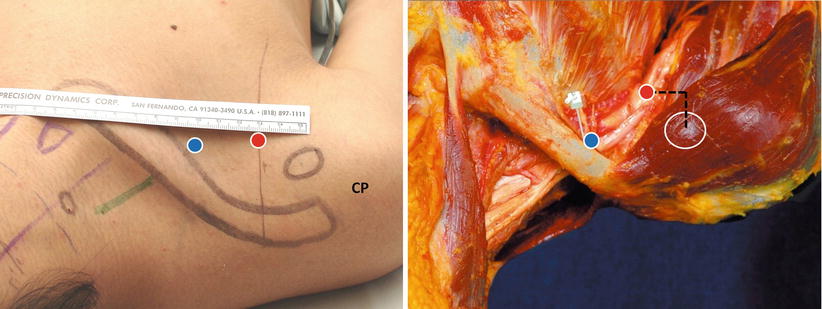
Fig. 31.6
Surface landmarks for the vertical infraclavicular plexus (VIP) approach and the coracoid (Wilson) approach to the infraclavicular block, illustrated in a volunteer and a cadaver. In the VIP approach, the needle insertion site (blue circle) is immediately inferior to the clavicle at its midpoint. In the coracoid approach, the needle insertion site (red circle) is located 2 cm medial and inferior to the coracoid process (CP). In both approaches, the needle is advanced perpendicular to the skin surface. Note that in the coracoid approach, the needle trajectory usually lies lateral to the thoracic cage. The green line indicates the interscalene groove and location of the brachial plexus (With permission from Danilo Jankovic)
Needle Insertion and Injection Technique
Disinfect the skin, drape the area appropriately, prime the block needle and tubing with local anesthetic solution, and attach a nerve stimulator at an initial current setting of 0.5–0.8 mA, pulse duration 0.1–0.3 ms, and frequency of 1–2 Hz. This lower initial current setting is recommended to reduce patient discomfort during needle passage through the pectoral muscles.
Infiltrate the needle insertion site with local anesthetic. Fixing the skin over the skin insertion point with the second and third fingers of the nondominant hand, insert a 50–80-mm block needle at a 90° angle to the skin in a strict parasagittal plane. Medial angulation must be avoided to prevent pleural puncture.
The pectoral muscles will initially be observed to twitch due to local stimulation as the needle passes through it. Once this twitch disappears, the nerve stimulator current may be turned up to 1 mA or more for nerve localization.
Advance the needle slowly and steadily until a distal motor response in the wrist or hand (1st– 3rd fingers) is obtained at a current threshold of 0.3–0.5 mA.
The ideal motor response, associated with the highest block success rate, is a posterior cord response of wrist or finger extension [6–9]. A medial cord response may also be accepted [10]. If elbow, wrist, or finger flexion is obtained (lateral cord), the needle should be advanced a little deeper and may need to be redirected slightly more inferiorly or deeper [11].
If no motor response is obtained despite inserting the needle to a depth of 4–5 cm in the average adult patient, or if bone is contacted (scapula), the needle should be withdrawn to the skin and redirected slightly more inferiorly or superiorly in the same parasagittal plane.
Once an appropriate distal motor response has been obtained, incremental injection of local anesthetic is performed with intermittent aspiration to exclude intravascular injection
Landmark-Guided Infraclavicular Block: Vertical Infraclavicular Plexus (VIP) Approach
Patient Position
The patient is placed supine with the operative arm adducted and if possible flexed at the elbow and placed on the patient’s abdomen to facilitate observation of motor responses.
It is recommended that the operator stand at the head of the patient, on the side to be blocked, as this makes it easier to observe and avoid inadvertent medial direction of the needle. However, the operator may also stand on the side of the patient if preferred.
Surface Landmarks
The following landmarks are palpated and marked.
The suprasternal notch.
The anterior acromion. Precise location of the anterior acromion is very important, and it can be distinguished from the mobile humeral head by passive movement of the upper arm.
The midpoint of the line between the suprasternal notch and anterior acromion is identified and marked—this is the needle insertion point, immediately inferior to the clavicle (Fig. 31.6).
Needle Insertion and Injection Technique
Disinfect the skin, drape the area appropriately, prime the block needle and tubing with local anesthetic solution, and attach a nerve stimulator at an initial current setting of 1–2 mA, pulse duration 0.1–0.3 ms, and frequency of 1–2 Hz.
Full access? Get Clinical Tree


