CHAPTER 33
Hydrosurgery of Disc
INDICATIONS
Hydrodiscectomy is a form of disc decompression within the realm of minimally invasive discectomy that is an effective, predictable method of nucleus removal in disc pathology such as contained disc herniation or disc budge. Though the gold standard for surgical treatment of herniated disc disease is open microdiscectomy, minimally invasive treatments like hydrodiscectomy has gained momentum as an alternative treatment option. As with other forms of disc decompression, the primary goal is to remove herniated disc material to relieve compression of a nerve root or other neural structures. Patients requiring this procedure often have nerve impingement causing radicular pain symptoms that have not been relieved with conservative treatment over a 2 months span or epidural steroid injections. Hydrodiscectomy is an effective and predictable method of nucleus removal, removing hydrated or desiccated nucleus pulposus, and poses no risk for thermal damage. Its blunt tip design minimizes risk of end plate and annular damage. This means there is maximum safety within the disc.
The indications for hydrosurgery based on anatomical location of pain include:
• Unilateral leg pain greater than back pain
• Radicular symptoms in a dermatomal distribution correlated with MRI findings
• Positive straight leg raise test
• No improvement after 2 months of conservative treatment
• MRI evidence of contained disc protrusion/herniation
• Failed selective nerve root block ×1
• Discography positive for concordant pain
• Well-maintained disc height more than 50%
THE CONTRAINDICATIONS FOR HYDROSURGERY
As with any intervention, one must weigh the potential benefits to the potential complications. The following are contraindications for hydrosurgery.
• Radiologic evidence of severe lateral recess stenosis
• Radiologic evidence of calcified disc herniations
• Radiologic evidence of severe degenerative facet disease or osteophytic impingement on nerve roots
• Radiologic evidence of marked ligamentum flavum hypertrophy causing spinal stenosis
• Radiologic evidence of free or extruded disc fragments within the spinal canal (extending cephalad or caudad)
• Clinical evidence of significant progressive neurologic deficits or cauda equine syndrome
• Pathologies or conditions, such as fracture, tumor, pregnancy, or active infection that would put patient at risk
• Disc height less than 50%
• A disc herniation that takes up more than 50% of spinal canal
• Previous surgery with scar tissue nerve root entrapment
• Bony spinal stenosis
• Active infection
• Coagulopathy
• Grade V annular tear on discography
• Lumbosacral instability on flexion/extension studies or spondylolisthesis on MRI
• Radiologic evidence of a diffuse annular bulge extending from the entire circumference of vertebral body
• Significant end plate changes see on MRI
RELEVANT ANATOMY
The human body normally has 5 lumbar vertebrae separated by intervertebral discs. These discs act as a shock absorber to resist compressive forces generated on the vertebral segment above and below. The disc also provides height and widens the neuroforaminal space for a nerve root to exit the spinal column. Each disc is composed of a core of fibrous material in a mucoproteinaceous gel called the nucleus pulposus surrounded by multiple layers of fibrocartilage called the annulus fibrosus. The vertebral column is supported anteriorly by the anterior longitudinal ligament and posteriorly by the posterior longitudinal ligament.
• Access to the disc is made just lateral to the neuroforamen.
• The neuroforamen is bordered laterally by the posterior edge of the vertebral body and the zygopophyseal joint, made up of the superior and inferior articular facets of the corresponding vertebrae above and below.
• Superior and inferior borders of the neuroforamen are made up of the pedicle superiorly and inferiorly of those corresponding vertebrae.
• Nerves and vessels reside in the neuroforamen; so special care must be taken to avoid the exiting nerve root and radicular arteries.
• It is important to identify the disc of the level in question and identify the superior articular process as your needle will be directed anterior and lateral to this structure.
• Kambin’s triangle (small triangular-shaped pathway) allows needle passage into the disc with minimal or no contact with the nerve root.
• The annulus entry point is defined inferiorly by the caudal vertebral plate and posteriorly by the inferior articular process of the vertebral segment.
• The exiting nerve root forms the hypotenuse of the triangle.
PREOPERATIVE CONSIDERATIONS
• Informed consent and proper explanation of all potential complications.
• Anticoagulation is a concern as there is inherent disruption of tissue from the introduction of a needle. Stop Aspirin and Plavix prior to procedure and hold Coumadin use. INR level prior to procedure should be below 1.2.
• Physical examination of the area for infection, skin ulceration or necrosis, and extent of disease must be done.
• Patient must be able to lie prone for the intended length of the procedure.
• Intravenous access for IV fluid and medications for sedation or hypotension if the patient experiences vasovagal reaction.
![]() Evaluation for contrast allergy: This is of the utmost importance as the utilization of contrast will allow for precise needle placement.
Evaluation for contrast allergy: This is of the utmost importance as the utilization of contrast will allow for precise needle placement.
Fluoroscopic Views (Figure 33-1)

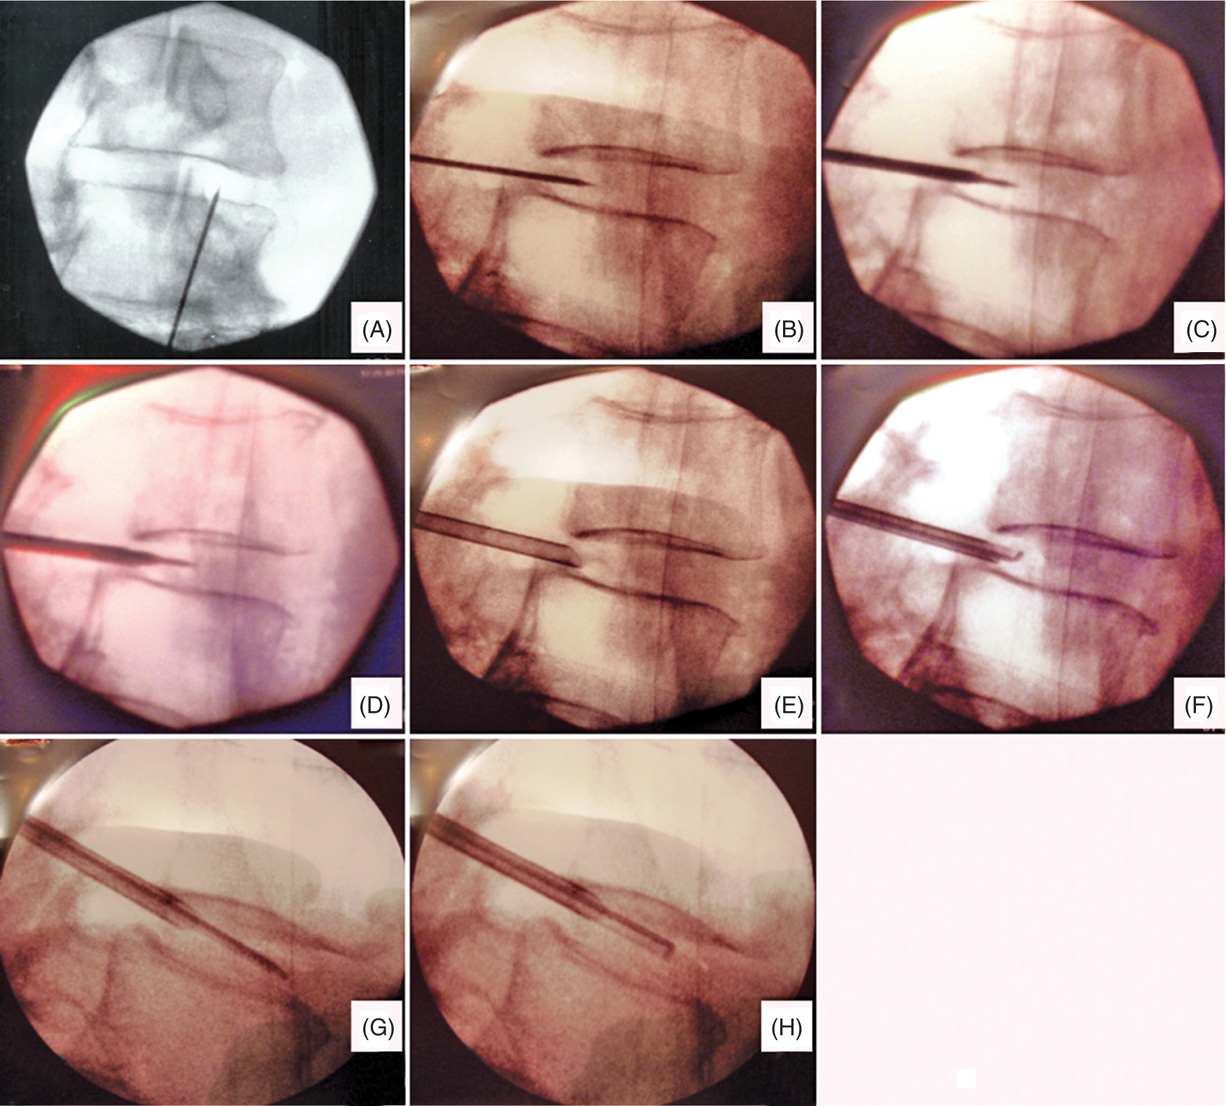
Figure 33-1. Fluoroscopic images of hydrodiscectomy procedure. (A) Oblique view obtained with superior articular process (SAP) lying over the disc. Entry point of needle is lateral to SAP. (B) Lateral view of the needle placed at the posterior junction of the nucleus pulposis and annulus fibrosis. (C) Insertion of dilator. (D) Insertion of cannula over needle and dilator followed by (E) removal of needle and dilator. (F, G, H) Insertion of microresector.
• Oblique view (the physician must ensure that the end plates are squared. Place the needle lateral to the SAP) (Figure 33-1A).
• Guide needle (lateral view showing that the needle is in the posterior border of the annulus at the nuclear-annular junction) (Figure 33-1B).
• Insert dilator over the needle (make sure that the introducer needle does not advance as the dilator is introduced) (Figure 33-1C).
• Cannula insertion over the needle and guidewire (Figure 33-1D).
• Removal of guide needle and dilator (Figure 33-1E).
• Insertion of microresector (note that the microresector is facing up). The microresector will be needed to be rotated to extract more material (Figure 33-1F, G, and H).
Selection of Needles, Medications, and Equipment (Figures 33-2 and 33-3)

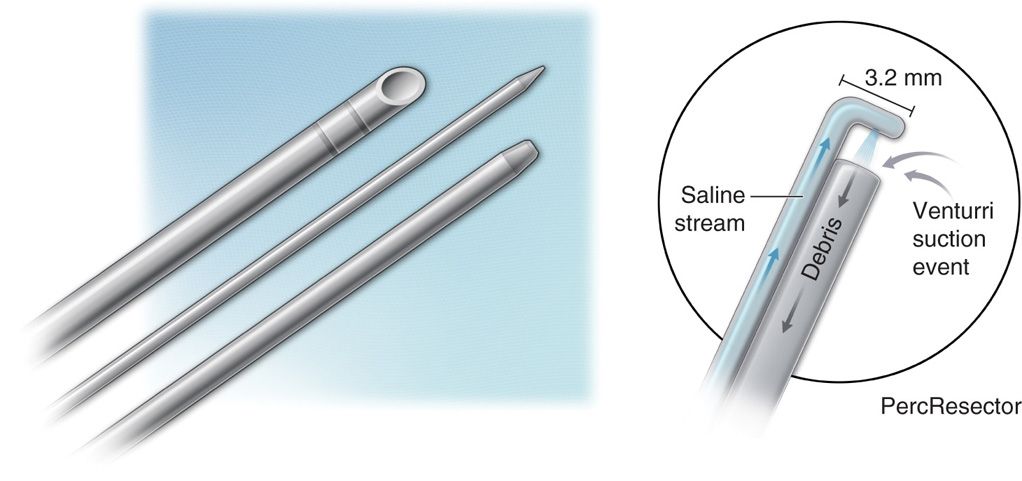
Figure 33-2. Picture of hydrodiscectomy dilator, needle, and cannula (curved and straight), along with graphical demonstration of the resector mechanism. (Reproduced with permission from HydroCision.)

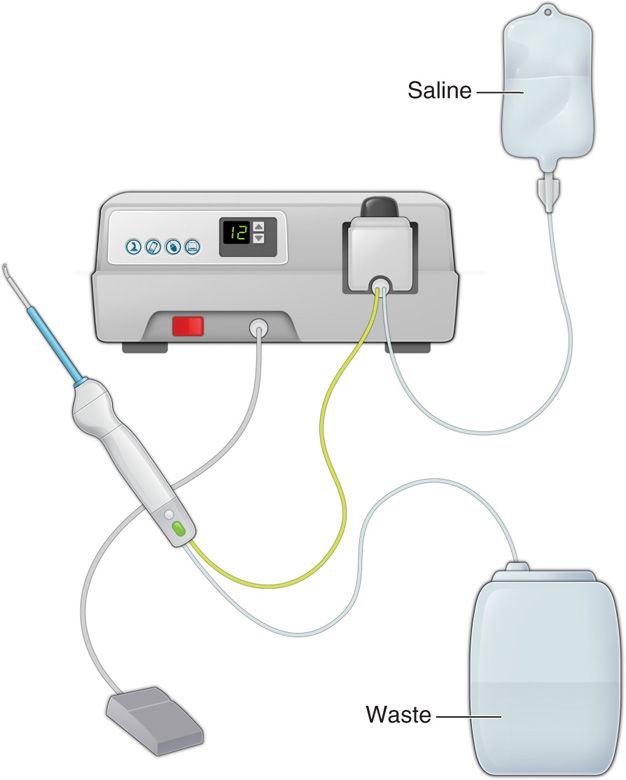
Figure 33-3. Graphical illustration of the percutaneous resector, hydrosurgery system, and basic setup. (Reproduced with permission from HydroCision.)
• SpineJet PercResector
• SpineJet Quick Connect
• SpineJet Percutaneous Access Set:
![]() Cannulae (curved/straight)
Cannulae (curved/straight)
![]() Spinal needle with stylet
Spinal needle with stylet
![]() Dilator
Dilator
![]() Guide wire
Guide wire
Intraoperative Technical Steps (Figure 33-4)

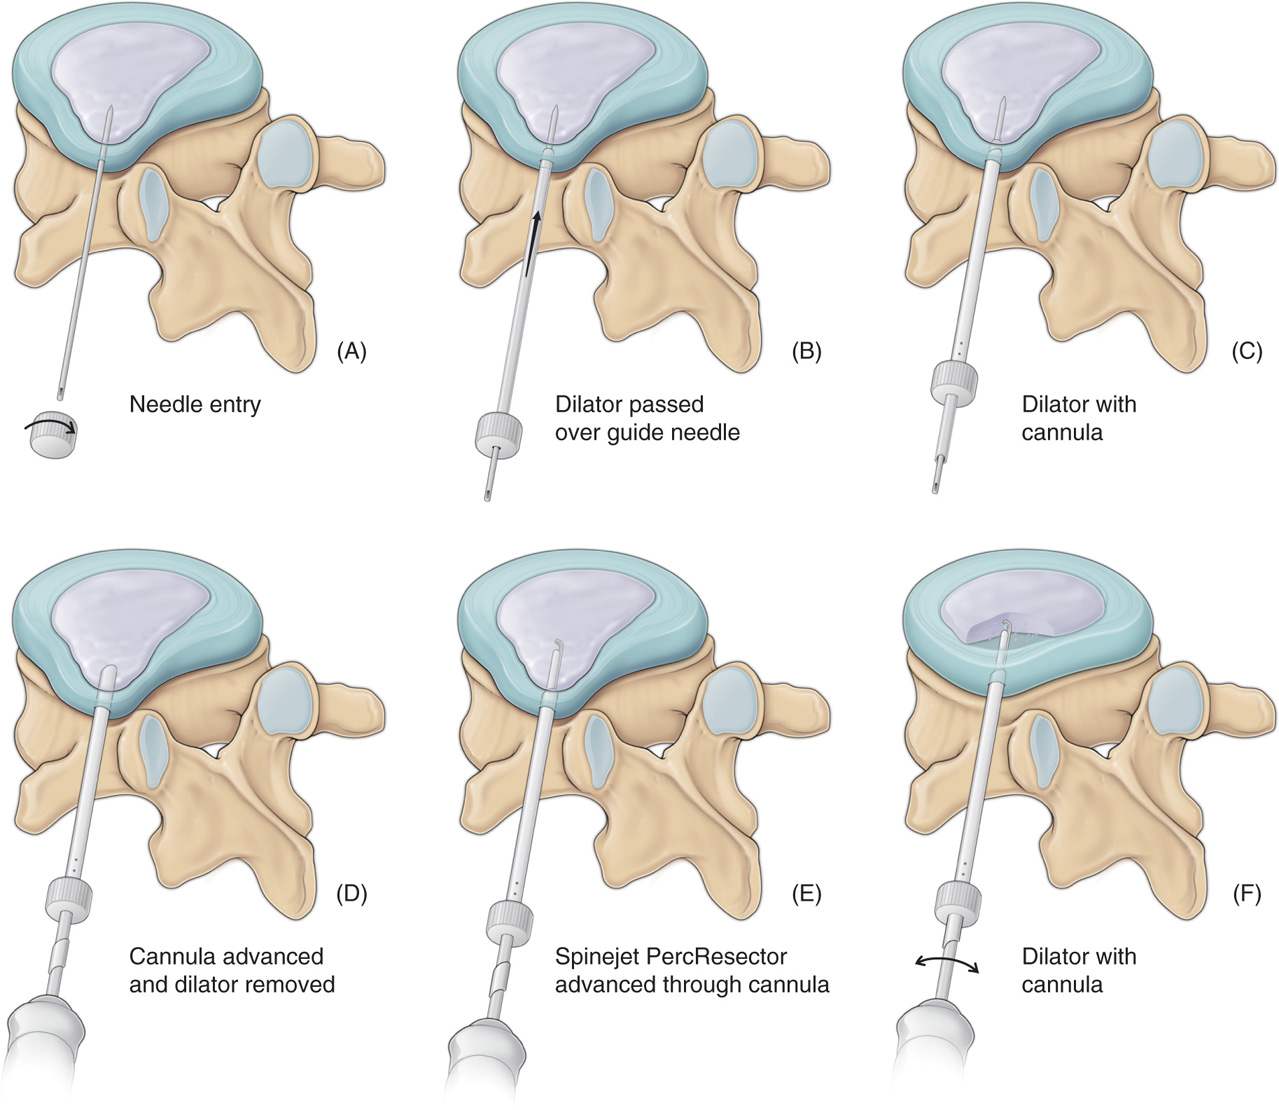
Figure 33-4. Graphical illustration of hydrodiscectomy procedure with initial needle insertion, followed by dilator insertion, introduction of cannula over the dilator, subsequent removal of dilator and needle, and advancement of the resector apparatus. (Reproduced with permission from HydroCision.)
• The patient is placed in the lateral decubitus or prone position with the lumbar spine slightly flexed. Use a pillow under the abdomen to achieve this position.
Fluoroscopy
• Visualize a PA view using fluoroscopy depicting the radiologic anatomy pertinent to performing a percutaneous disc procedure.
• Pertinent anatomy to see in this view are:
![]() Inferior end plate of superior vertebral body
Inferior end plate of superior vertebral body
![]() Superior end plate of inferior vertebral body
Superior end plate of inferior vertebral body
![]() Intervertebral disc space
Intervertebral disc space
![]() Lateral aspect of superior articular process
Lateral aspect of superior articular process
![]() Anterior surface of vertebral body
Anterior surface of vertebral body
![]() Spinal canal
Spinal canal
Procedure
• The spinous process of the vertebra just above the disc is palpated and the point just below and lateral to that process is prepped with antiseptic solution.
• The skin and subcutaneous tissue are then locally anesthetized. (The patient must remain conscious during the procedure to inform the operator immediately if nerve root contact is made.)
• Access to the disc is optimally visualized when the superior articular process of the vertebral body below is positioned midway between the anterior and posterior disc margins, and the x-ray beam is angulated slightly caudally or cephalad so that the superior end plate margins of the inferior vertebral body align.
• Ensure that the iliac crest does not obscure the view of the superior articular process which can occur in some cases.
• Once proper positioning is obtained the guide needle is ready to be introduced. A small incision can be made to facilitate entry into the skin.
![]() The needle is first advanced in a stepwise fashion parallel to and halfway between the vertebral end plates, with the tip directed to the center of the disc until the needle tip rests slightly through the annulus of the affected disc.
The needle is first advanced in a stepwise fashion parallel to and halfway between the vertebral end plates, with the tip directed to the center of the disc until the needle tip rests slightly through the annulus of the affected disc.
![]() Proper care should be employed so that the needle does not advance completely through the disc.
Proper care should be employed so that the needle does not advance completely through the disc.
![]() Advance the needle into the disc first using lateral views, then intermittent A/P and lateral views until the needle is about in the center of the nucleus midway between either end plate.
Advance the needle into the disc first using lateral views, then intermittent A/P and lateral views until the needle is about in the center of the nucleus midway between either end plate.
• The dilator is then advanced over the needle.
• Confirm placement with A/P and lateral views.
• The cannula is then advanced over the dilator.
![]() Failure of properly positioning the needle/cannula could result in contact with the end plates.
Failure of properly positioning the needle/cannula could result in contact with the end plates.
• The dilator is removed and replaced by the SpineJet PercResector.
• Optimum angle must be maintained, keeping in mind the limitations and risk of entering the epidural space, thus injuring the neural structures, or entering the retroperitoneal space and inadvertently injuring the vital visceral organs.
• Exiting nerve root from the upper level is located well above the anticipated needle path.
• Each procedure typically removes up to 15% of the disc.
• The usual time in disc 2 to 3 minutes.
• Typically 2 to 3 g of disc material is removed.
POSTPROCEDURE CONSIDERATIONS
• No shower or bathing for 24 hours
• No baths or pools for 48 hours
• PRN pain control
• No strenuous activity before post-op 6-week evaluation
• 6 weeks back brace with any activity
MONITORING OF POTENTIAL COMPLICATIONS
While this procedure offers the operator a more straightforward approach and considerably limits the potential complications with a lateral approach with angled or curved needle, there are still obstacles that could be encountered. The potential complications are:
• Infection
• Bleeding
• Nerve injury
• Spinal cord injury or paralysis
CLINICAL PEARLS AND PITFALLS
• Always make sure you look at both AP and lateral views before advancing the needle in the disc space.
• Discography contrast can be injected within the disc to confirm intranuclear placement.
• Advance the needle under live fluoroscopic view to prevent migration of the needle as the cannula is being passed.
• Make sure to review MRI prior to procedure to determine the position of the disc pathology. For example, if the disc is protruding posteriorly as in a central herniation, needle entry has to be positioned as dorsal as possible (8-10 cm from the spinous process) to ensure dorsal placement of needle.

Full access? Get Clinical Tree


