Emergency Evaluation and Treatment
Hand injuries are one of the more common reasons for emergency department visits. Hand injuries may be isolated or part of multiple trauma. These injuries are seldom life-threatening but can result in significant disability, threatening a patient’s livelihood and lifestyle. These injuries can have significant economic impact with possible loss of occupation and lost time from work. Systematic examination and initial care has a direct effect on the ultimate consequence of any hand injury. Overall, it is far better to under treat and refer than to over treat and cause avoidable iatrogenic injury or disability. The course of recovery depends on initial management.
A hand-injured patient may be examined while they are sitting but the environment should be calm and controlled. That does not apply to a patient with hand lacerations. It is best to examine the injured patient with a hand laceration while supine. The hand should be extended on a hand table next to the bed. The area should be clean, sterile, and have excellent lighting and all essential instruments available. It is best to have an assistant if possible for helping with lighting, positioning, and repair. There is a tendency in EM to see hand patients in hallways, chairs, and less than ideal circumstances. This must be avoided at all costs.
Bleeding is controlled by direct pressure with sterile gauze packs, elevation, and, if necessary, an arterial tourniquet (eg, blood pressure cuff inflated above systolic blood pressure). Do not use clamps unless all other measures fail. Blind clamping of vessels can lead to further injury.
Ascertain the mechanism of injury by questioning the patient or others. An exact description of how the injury occurred will help determine the need for X-ray, antibiotics, urgent consultation in the ED, or in a follow-up visit. It is important to document the mechanism of injury, the time at which it occurred, and the environment in which it occurred. Ask about the following details associated with the mechanism of injury:
- Type of injury—crush, exploding, or simple amputation.
- Lacerations—exactly what device was involved and how the lacerations were caused.
- Position of the hand at the time of the injury (ie, fingers extended or flexed).
- Presence of pain, numbness, paresthesias, weakness, discoloration, coldness, clumsiness or poor coordination, or crepitus.
- Circumstances surrounding open wounds—environment, whether inflicted in a dirty environment (ie, sewer or barnyard) or in a specific situation (ie, fight-clenched fist).
- History of prior or existing hand or upper extremity injuries or disorders. Dupuytren’s fasciitis, arthritis, and benign tumors are the most common nontraumatic problems noted.
- Bleeding disorders likely to influence hemostasis (eg, hemophilia).
- Factors that might impair wound healing (eg, use of corticosteroids).
- Tetanus immunization status (Chapter 30).
- Any allergies.
- General state of health, medications, and ongoing treatments.
Examination of the hand is started while the history is being taken. In the event of an open wound, proper instruments and sutures must be made ready. Sterile technique is essential at all stages of the examination and early treatment of hand injuries. A sensory examination for two-point discrimination should be done with an opened paper clip before anesthesia is used. Before beginning active examination, anesthetize the injured area of the hand, and apply and inflate a tourniquet. Be certain to remove rings from the patient’s hands prior to any examination, radiographs, or procedures.
Anesthesia must be used if a wound is to be explored or sutured. The preferred anesthetic is 1% lidocaine without epinephrine. It is recommended that epinephrine never be used with local anesthetics in hand injury, because it may constrict the vessels and interfere with blood flow. See Chapter 30, Wound Care for further discussion of specific techniques.
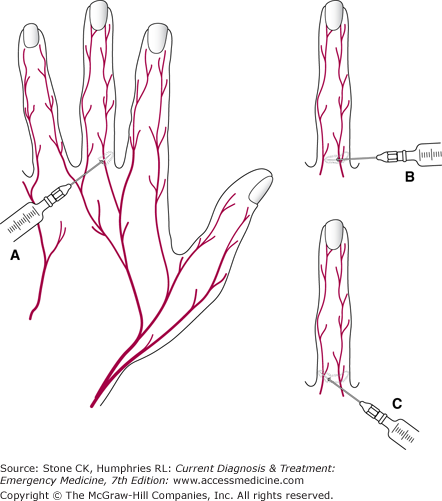
(See Figures 29–1, 29–2, 29–3.) Digital blocks are preferred for procedures done distal to the PIP joint. Half-inch (1.5-cm) needles of 25, 27, or 30 gauge should be used with small volumes of 1% lidocaine, or 0.5% bupivacaine may be used as a mix for a longer-acting anesthetic. In a digital block, use about 0.5–1.0 mL anesthetic around the digital nerve. The injection should never render the tissues tense nor be circumferential.
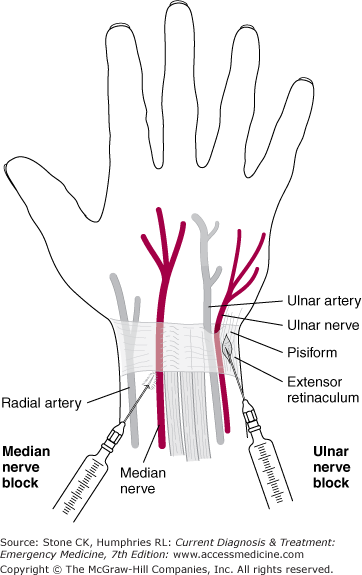
In blocking peripheral nerves, the physician must be familiar with the anatomy of nerve distribution and the surrounding tissues. To avoid intravascular injection, always aspirate before injecting the anesthetic agent.
This block is preferred for injured digits, particularly the distal phalanx, nail bed, and volar tip. But should not be performed if there is an infection or suspicion of a flexor tenosynovitis. The digit to be blocked is extended and comfortably placed on the examination table. A 5-cc syringe with 27-gauge needle is preferred. The block should be performed with a 50:50 mixture of 1% lidocaine: 0.5% bupivacaine (see Figures 29–4). Identify the midpoint of the MCP flexion crease, insert at 90° until striking bone, then angle the tip of the needle 45° distally. Inject 2–3 cc into the flexor tendon sheath. With the tips of the opposite index and long finger palpate the infusion of medication into the sheath. In addition, the digit will gradually assume a partially flexed position. These blocks only require one needle stick. They are safe and effective. Complications are rare.
Figure 29–4.
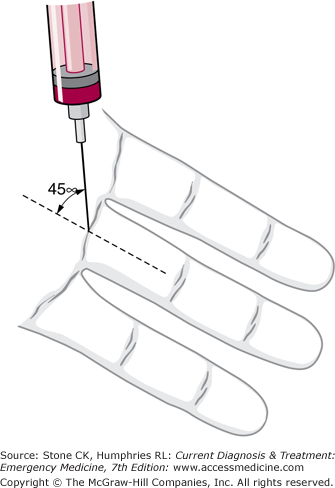
Transthecal digital nerve block. After inserting the needle at the proximal digital crease at a 90° angle to the level of the bone, the needle is withdrawn 2–3 mm and angled 45° to the long axis of the digit as shown and the injection of anesthetic along the flexor tendon sheath is performed slowly.
(See Chapter 30, Figure 30–1.) Wounds can be infiltrated locally as long as the amount of anesthetic injected does not make the tissues tense.
Systemic toxicity from over dosage may occur when large areas are anesthetized. This can be avoided by calculating the number of milligrams of drug in the volume of solution that may be required and then limiting the volume of injection so as to avoid giving a toxic dose (see Table 30–1). For example, the maximum adult dose of 1% lidocaine (10 mg/mL) without epinephrine is 300 mg (or 30 cc).
Anesthetic solutions should not be injected into inflamed areas unless these directly overlie an abscess that is to be drained. Such injections impair local tissue resistance to infection, may result in rapid systemic absorption because of the increased vascularity of inflamed tissues, and may be ineffective if the local tissue pH is low enough to reduce the anesthetic agent’s ionic dissociation, which is essential for anesthetic activity.
An arm tourniquet should be in place when bleeding hand wounds are examined or treated. A blood pressure cuff can be used but should be inverted so that the tubes extend cephalad and out of the way. First, wrap the patient’s arm with cast padding, then place the cuff and inflate to 200–250 mmHg before locking (or Kelley clamps placed). This method should sufficiently occlude the brachial artery and reduce further hemorrhage. Be aware, a properly placed tourniquet will become quite painful to the patient within a few minutes and should be used only as necessary to prevent uncontrolled blood loss or allow essential evaluation of the wound.
By dividing the examination into four distinct steps, much useful information can be gained rapidly.
Observe the posture of the hand lying supine and at rest upon the examining table. Any marked variation from the normal attitude should alert the examiner to the possibility of deforming injury.
Observe active function of the various musculotendinous units and skeletal structures within the areas of injury. A careful examination of the flexor digitorum profundi and flexor digitorum superficialis must be performed.
Assess loss of sensibility by testing for sweat and for awareness of pain. Two-point discrimination is a sensitive, objective measure of sensory deficit. This may be difficult to be performed accurately, and the character and location of a wound may be more helpful than sensory nerve testing in determining nerve injury. Sensory testing must be performed before application of a tourniquet and administration of anesthetics.
Inspect the wound in a sterile, bloodless field with a simple 2.5-power magnifying loupes, if available. A tourniquet should be in place but should not be inflated until the anesthetic has become effective unless there is uncontrollable hemorrhage (see above). The examination must proceed concurrently with early treatment such as cleansing and debridement (Chapter 30) before definitive emergency treatment and suturing are done. Note: In handling and examining tissue, remember the importance of removal of blood clots and careful manipulation of tissues to preserve the microcirculation.
1This chapter is a revision of the chapter by Adam Saperston, MD, MS, from the 5th edition.
Examination of the Hand and Assessment of Function
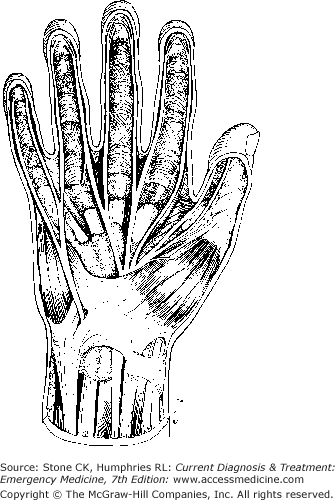
(See Figures 29–5 and 29–6.) The hand is a highly mobile organ of extraordinary sensibility and remarkable adaptability, but it can be troubling if injured, causing permanent stiffness, pain, or loss of sensibility. Prevention is key and a sound knowledge of functional hand anatomy helps diagnosis and treatment of these wounds.
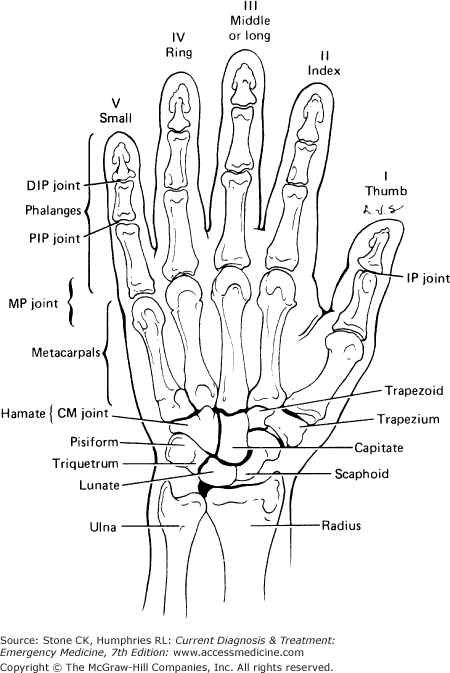
(See Figures 29–7.) The hand and each finger have ulnar and radial sides and palmar and dorsal surfaces. There are five digits numbered and named as follows: I (thumb), II (index), III (long or middle), IV (ring), and V (small [little]). Commonly used abbreviations for the joints of the hand are shown in the box at the beginning of the chapter. Always specify which hand is injured, and note whether it is the dominant or nondominant hand.
The skin of the palm sweats freely and is thick, tough, tethered by fascia, highly innervated, and well cushioned by fat. The dorsal skin, by contrast, is thin, very mobile, and less well supplied with sensory nerves. The arterial supply is mainly palmar. Venous and lymphatic drainage is mainly dorsal and can be impeded by dorsal injury, constriction, or taut skin.
See Figures 29–5.
There are three wrist flexors: the flexor carpi ulnaris (innervated by the ulnar nerve), the palmaris longus (median nerve), and the flexor carpi radialis (median nerve).
There are nine digital flexors (one for each IP joint). The flexor pollicis longus (innervated by the median nerve) flexes the thumb IP joint. Flexor digitorum superficialis (sublimis) moves each PIP joint (all median nerve). Each superficialis is generally able to contract independently, because the muscles are independent for each digit.
A flexor digitorum profundus moves each DIP joint (median nerve to index and long fingers; ulnar nerve to ring and small fingers). The three ulnar profundi have a common muscle mass, and therefore one cannot contract and move one of these digit tips independently.
The flexor carpi radialis is tested by having the patient flex the wrist; it can be palpated on the radial aspect of the wrist. The flexor carpi ulnaris is also palpable when flexed. The palmaris longus is palpated by partially flexing the palm and touching the thumb and fifth digit to one another.
The superficialis flexors are tested by holding three digits not being tested in full extension and directing the patient to flex the fourth one. PIP flexion indicates an intact superficialis to that finger.
The profundus flexors are tested by asking the patient flex the distal tip of the examined digit while immobilizing the rest of the digit at the PIP joint.
The flexor pollicis longus is tested by having the patient actively flex the terminal phalanx of the thumb.
The flexors should be tested actively and with opposition. A partial flexor tendon laceration is best identified through opposition testing.
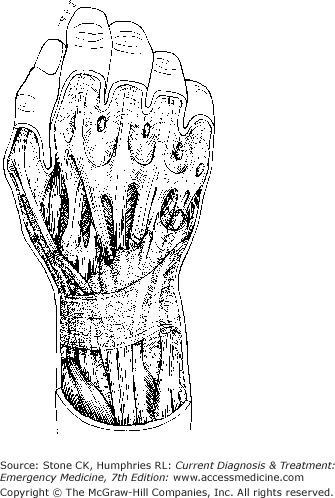
(See Figures 29–6.) All extensors are innervated by the radial nerve.
The extensor carpi radialis longus and extensor carpi radialis brevis insert into the bases of the second and third metacarpals, respectively.
The extensor carpi ulnaris inserts into the base of the fifth metacarpal.
The abductor pollicis longus deviates the wrist radially and stabilizes the base of the thumb (first metacarpal). It is tested by abducting the thumb radially.
The extensor pollicis brevis acts mainly at the MP joint; the extensor pollicis longus acts at the IP joint in concert with the intrinsics but, unlike the intrinsics, can extend the joint with much force and can even hyperextend it.
An extensor digitorum communis to each finger forms the central slip (MET) of the extensor hood.
The index and small fingers have independent (proprius) extensor tendons as well. These extend these fingers when the long and ring fingers are flexed.
Test the extensors by asking the patient to extend the fingers at the MP joint and to extend the IP joints. The latter is achieved by action of the extensor in conjunction with the intrinsic tendons in the extensor hood. The proprius tendons of the index and small fingers always lie ulnar to the extensor digitorum communis of each.
Of 20 intrinsics, 15 are innervated by the ulnar nerve and five by the median nerve. In conjunction with the extensor tendon, they form the extensor hood mechanism, which is a proximally based triangular sheet of three interconnected tendons. The lateral margins (“lateral bands”) are the small LETs from the intrinsic muscles. The central large tendon (“central slip”) from the extrinsic extensors is called the MET, which inserts on the middle phalanx of each finger. The TET is made up of a coalescence of METs and LETs into a very thin tendon that inserts on the distal phalanx. In the case of the thumb, which has only two phalanges, the equivalent of the MET is the extensor pollicis brevis; the equivalent of the TET is the extensor pollicis longus. The intrinsics flex the MP and extend the IP joints and abduct and adduct the digits. Working all together, they cup the palm.
The thenar and hypothenar intrinsics act to pronate the thumb and little finger and thereby cup the palm. Have the patient make the distal fat pads of the thumb and small finger meet.
Have the patient abduct the extended second through fifth digits; then flex these digits at the MP joints while extending the PIP and DIP joints.
The three major nerves to the hand are the radial, median, and ulnar nerves.
The radial nerve innervates all extensors.
Muscle testing is done by having the patient extend the wrist and digits (Figures 29–8C). This is best performed against opposition.
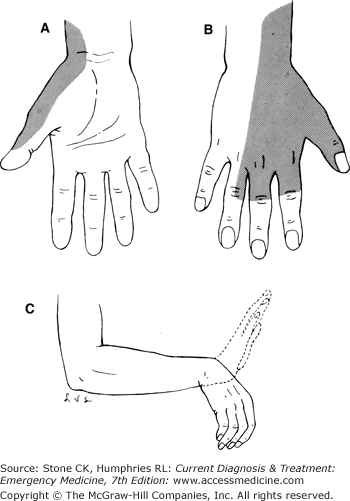
The radial nerve gives off a sensory branch that provides sensibility for the dorsal–radial aspect of the hand (Figures 29–8A and B).
The median nerve innervates 9 of 12 extrinsic flexors, the lumbricals to the index and long fingers, and the three muscles of the thenar eminence, which are mainly concerned with opposition.
Testing for high median nerve injuries is done by flexing the DIP joint of the index finger and the IP joint of the thumb (Figures 29–9).
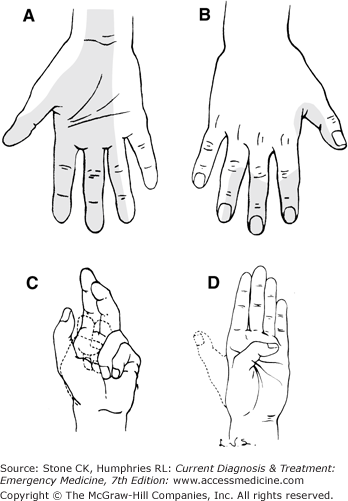
Have the patient passively hold the fourth and fifth fingers fully flexed into the palm and follow this by full active flexion of the second and third fingers (Figures 29–9C).
Have the patient flex the thumb to touch the distal palm at the base of the fifth finger (Figures 29–9D).
To test for low median nerve loss (eg, at the wrist), have the patient pronate the thumb, pressing the distal fat pad of the thumb against that of the ring finger. Then feel for a firm, contracted adductor pollicis brevis alongside the thumb meta-carpal.
The median nerve provides sensibility to the radial two-thirds of the palm and the palmar surfaces of the thumb, the index, and long fingers, the radial side of the ring finger, and the dorsal surface of the middle and distal phalanges of these fingers (Figures 29–9A and B). Because of the importance of this zone of sensibility, the median nerve is called the “eye of the hand.”
The ulnar nerve innervates 15 of the 20 intrinsic muscles and only three extrinsic muscles.
The intrinsics are tested by any of the following maneuvers: With the palm flat on the table, have the patient abduct and adduct the fingers, cross the fingers, or forcefully move the pointed index finger in a radial direction.
The extrinsics are tested as follows: Forcefully flex the tips of the ring and small fingers to meet the distal palm to evaluate their profundi (Figures 29–10C); then forcefully spread the fingers apart and palpate for a tensed flexor carpi ulnaris tendon at the wrist.

The ulnar nerve innervates the radial and ulnar halves of the pads of the small finger, the ulnar half of the pads of the ring finger, and the ulnar side of the hand (Figures 29–10A and B). The additional loss of sensibility on the dorsoulnar aspect of the body of the hand signifies a high lesion well proximal to the wrist.
Severe injuries to the hand require imaging to detect fractures, dislocation, and opaque foreign material or gas. X-ray is the standard imaging modality for the majority of hand injuries; CT or MRI should be utilized in consultation with the hand/orthopedic surgeon. Special radiographs should be requested, depending on the site and direction of trauma. For example, scaphoid bone or digit-specific films should be requested as clinically indicated to improve evaluation of isolated injuries. If there is any doubt about the normalcy of the skeleton, comparable views of the opposite side should be taken for comparison. Recent literature has also demonstrated the utility of high-resolution ultrasound (HRUS) in the evaluation of common soft-tissue diseases of the hand/wrist (eg, synovitis, tendon injury) as well as detection of foreign bodies in the tissue. There is insufficient evidence for HRUS in diagnosis of fractures. This modality may be limited by the availability of an experienced upper extremity sonographer.
Equipment and Materials for Treatment
Suturing should be carefully done with fine-pointed and very sharp cutting needles (eg, Ethicon P-1, P-3).
Fine (5-0 or 6-0) monofilament polypropylene suture material is preferred for skin closure. Only in infants and children should an absorbable suture such as 5-0 or 6-0 chromic or plain catgut be used.
Fine plastic surgery forceps, retractors, clamps, and needle holders are required.
The skin around the wound may be sterilized as described in Chapter 30. The hand and wound may be irrigated with normal saline. Avoid prolonged soaking.
Petrolatum-impregnated gauze followed by a surgical gauze sponge saturated with water (tap water or sterile saline solution) is applied over the wound as the “core” dressing. The wetness draws blood from the wound and prevents dead space. None of this goes circumferentially around the digit, hand, or forearm.
A foam pad such as a Reston pad with an adherent surface on one side (or comparable substitute) is then applied over the core dressing. Soft elastic gauze (Kerlix, Kling) or cast padding to form a soft, well-padded dressing is applied over the foam pad and may go circumferentially around the part.
The wrist is the most important joint to splint for all major hand injuries, even if only one digit is injured. Well-padded plaster as a splint protects the hand.
For isolated pain-free dorsal injuries at the DIP or PIP joint, a tongue blade cut to the length of two phalanges and padded with gauze or foam rubber makes an excellent splint. There are ready-made aluminum splints with soft padding or other surface that are most effective. If there is a wound over the joint, such a splint should be placed on the palmar side; if not, it is placed on the dorsum. After cutting the splint be certain that sharp edges are smoothed and padded and the patient is protected.
Related posts:


Full access? Get Clinical Tree


