Immediate Management of the Compromised Airway
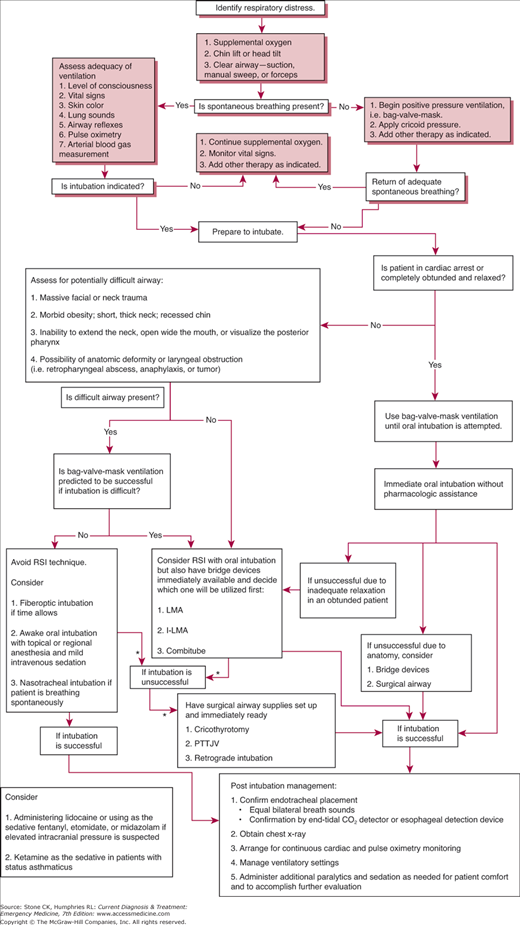
Securing the airway and assuring adequate ventilation are the first priorities in the resuscitation of any acutely ill or injured patient. Without a patent airway and adequate gas exchange, other resuscitative measures will usually be futile. Thus, attention to the airway must precede or occur simultaneously with any other type of management. The exception is the initial defibrillation in cardiac arrest due to ventricular fibrillation, if it can be performed immediately. (See Figure 10–1.)
First, determine the patient’s level of consciousness and note the presence of respirations and grade respiratory effort. In patients with known or suspected cervical spine (C-spine) injury, all assessments and maneuvers should be undertaken with the C-spine immobilized in a neutral position to prevent cord injury.
If the C-spine is not injured, place the head in the sniffing position with the chin lift maneuver to open the airway (Figure 10–2). For patients with potential C-spine injuries, a jaw-thrust maneuver should be used. Clear the airway of obstructions, using a rigid suction catheter to remove any blood, vomitus, or secretions from the oropharynx. Remove any large obstructing foreign bodies from the oropharynx manually or with Magill forceps (see Chapter 9).
Figure 10–2.
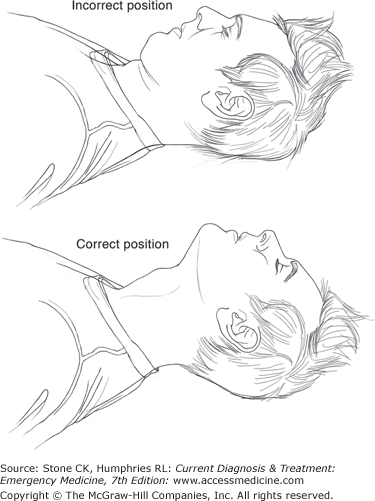
In the sniffing position, the head is slightly extended and the neck is flexed on the shoulders. This aligns the axis of the airway with the mouth and pharynx, facilitating direct visualization of the cords during intubation. It is particularly important in young children and infants, in whom the larynx is considerably more anterior. A pad beneath the occiput improves flexion of the neck. This position cannot be used when there is cervical spine injury.
If the patient remains apneic, assist ventilation using a bag–valve–mask device (eg, Ambu bag) or mouth-to-mouth breathing (see Chapter 9). If adequate personnel and equipment are available, immediately perform endotracheal intubation.
Administer high-flow oxygen. Clear and position the airway as described above. Identify evidence of upper airway obstruction. Prolapse of the tongue and accumulation of secretions, blood, or vomitus are common causes of obstruction. Signs may include wheezing, sonorous respirations, stridor, cough, and dysphonia. Upper airway obstruction should be removed if present. Back blows or the Heimlich maneuver may clear the obstruction. If not, use suction or direct visualization and a Magill forceps or finger. Blind finger sweep is contraindicated. Obstructions that recur or persist require endotracheal intubation, either orotracheally or via cricothyroidotomy, tracheostomy, or percutaneous transtracheal jet ventilation (PTTJV) (see also Chapters 7, 9, and 50).
Evaluate the effectiveness of the patient’s respiratory effort. Helpful signs include respiratory rate, tidal volume, accessory muscle use, level of consciousness, skin color, upper airway sounds, and auscultated lung sounds. Further assessment may include pulse oximetry, arterial blood gas measurement, end-tidal CO2 capnography, and chest radiography. If intubation is indicated (Table 10–1), continue high-flow oxygen and assist ventilation as needed. Assemble all items necessary for the appropriate method of intubation (Table 10–2). Check for equipment malfunction. If the patient is alert, inform him or her of your plan.
|
|
All patients with airway or ventilatory compromise require high-flow oxygen. Oxygen through a nasal cannula at flow rates up to 6 L/min provides a patient with 20–40% inspired oxygen concentration. A variety of masks are available that can accept oxygen flow rates of 5–15 L/min. Masks equipped with reservoirs and non-rebreathing valves can deliver oxygen concentrations close to 100% at flow rates of 10 L/min if an adequate seal can be maintained between the mask and face.
Before attempting intubation, preoxygenate the patient with 100% oxygen for 5 minutes or have the patient perform eight vital capacity breaths. In a ventilating patient, this should provide 6–7 minutes of protection against hypoxia if the patient becomes apneic. Caution should be exercised because this time interval can be significantly shortened in an ill patient. In an apneic patient, preoxygenation with a bag–valve–mask unit provides 2–3 minutes of protection against hypoxia.
A rigid-tipped suction catheter should be available at all times to keep the airway clear of blood and secretions. The suction device should be set at 120 mm Hg. After intubation, suction the tracheobronchial tree with a sterile, flexible catheter as necessary.
When the jaw thrust or chin lift is ineffective in airway opening, a nasal or oral airway may support collapsed oropharyngeal tissues and permit adequate ventilation. A range of sizes should be readily available in all areas of the emergency department (Figure 10–3).
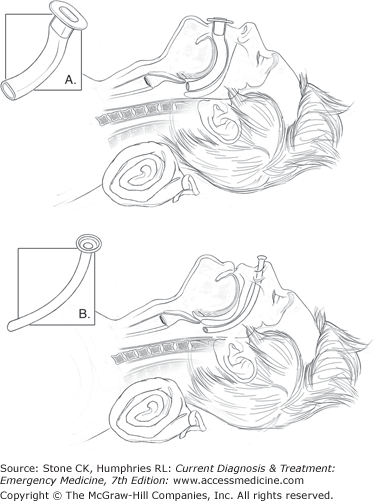
The oral airway should only be used in an obtunded patient. It may be inserted over a tongue blade or positioned upside down as it enters the mouth and rotated after the tongue is cleared. The former is preferred in pediatric patients as to prevent trauma to the soft palate. Positioned correctly, it retracts the tongue upward and anteriorly. Care must be taken not to push the tongue backward into the pharynx, worsening the obstruction. An oral airway that is too long could potentially displace the epiglottis over the larynx, resulting in complete obstruction.
The soft, rubber, noncuffed nasopharyngeal tube tends to be better tolerated in a semiobtunded patient. Lubricate the tube with anesthetic jelly before insertion. Insert it through the least obstructed nostril, advancing it posteriorly along the floor of the nostril until it bypasses the tongue. If it is too long, it may enter the esophagus, resulting in ineffective positive pressure ventilation and gastric distention. Epistaxis may occur during insertion, and suction should be available.
In patients with intact airway reflexes, placement of either device may cause emesis, gagging, or laryngospasm. During and after placement, head position should be maintained to optimize airway patency. Where indicated, spinal precautions must be maintained. Evaluate breath sounds after placement of either device to ensure that obstruction has not occurred. Care must be taken to avoid trauma during placement.
Following airway opening, positive pressure ventilation may be used to preoxygenate a patient before intubation. Occasionally it may be the only form of ventilation available in an apneic patient when an airway cannot be secured. In general, however, it is not recommended for prolonged ventilation owing to gastric dilatation and technical difficulty.
The bag–valve–mask unit is the device most commonly used to provide positive pressure ventilation in the emergency department. The bag–valve–mask unit has a self-inflating reservoir that accepts 15-L/min oxygen flows. A non-rebreathing valve permits this reservoir air to enter through a separate port from air that is being expired. At these flow rates, inspired air will approach 100% oxygen, provided adequate seal is established. The self-filling bag permits use with spontaneously breathing patients. The unit can usually be attached to an endotracheal tube (ET) after intubation for manual bag-assisted tracheal ventilation.
The procedure for using the bag–valve–mask unit is described in Chapter 7. Use of this device is difficult in the hands of a single operator because effective bag–valve–mask ventilation depends on a tight seal between the mask and face. Often this requires two hands and a second operator to compress the bag. Many circumstances of anatomic variation, facial hair, or maxillofacial trauma make a tight seal impossible. During bag–valve–mask ventilation, proper head position must be maintained to preserve airway patency. Monitor the effectiveness of ventilation closely by frequent assessments of chest wall movement, lung sounds, and gastric dilatation.
The positive pressure generated by bag–valve–mask ventilation leads to gastric dilatation and abdominal distention. This results in decreased lung compliance and significant risk of emesis and aspiration. A clear mask is recommended to identify emesis. Suction equipment must be available. In patients with unprotected airways, cricoid pressure (the Sellick maneuver) is recommended (Figure 10–4). To perform the Sellick maneuver, apply firm, direct pressure on the circumferential cricoid cartilage. This will compress the esophagus posteriorly, decreasing gastric dilatation and reflux. If emesis occurs, release pressure on the cricoid to prevent esophageal rupture and aggressively suction the hypopharynx. If bag–valve–mask ventilation must be prolonged for any reason, place a nasogastric tube to reduce gastric dilatation and its consequences. Because of operational difficulties and risks of aspiration, the bag–valve–mask is a temporizing measure under most circumstances. Patients who require bag-assisted ventilation should generally be intubated as soon as it can be accomplished safely and practically.

The mouth-to-mask technique is another method of providing positive pressure ventilation. This method may be easier for a single operator, because both hands can be used to seat the mask. Supplemental oxygen is provided via a port in the mask or via a nasal cannula worn by the operator.
Extraglottic devices can be used emergently, if no rapid sequence intubation (RSI) protocol exists or endotracheal intubation fails in the field. The esophageal tracheal Combitube (ETC) may even be potentially used as an ET if blind insertion results in tracheal placement, but this phenomenon is uncommon. Alternatively, the King LT airway is now becoming a popular device due to its ease of use and rapid deployment.
The ETC has found favor in prehospital and emergency department settings. It comprises two tubes that form a single double-lumen tube. A proximal balloon isolates the hypopharynx, whereas the distal balloon occludes the esophagus or the trachea, depending on its location. The tube is inserted blindly and is fairly stiff, so that it usually enters the esophagus. Tube 1 (larger tube) is closed distally with side holes for ventilation. Tube 2 (smaller tube) is open distally and gives a direct route to either the lungs or the stomach. Tube 1 is always ventilated first, when confirming placement of the tube. Advantages of the ETC include ease of placement, partial protection of the airway from aspiration, and lack of manipulation of the C-spine in the trauma patient.
The King LT airway is a single-lumen tube with two cuffs, but both are inflated simultaneously at a solitary site instead of the two required on an ETC. A ventilation port exists between the oropharyngeal and esophageal cuffs that provides ventilation toward the larynx. Insertion of King LT airway utilizes a similar technique as the ETC.
Esophageal tubes are contraindicated in semiobtunded patients, children, and patients less than 120 cm in height. Do not use them when there is known esophageal injury or ingestion of caustic substances. Complications are listed in Table 10–3. Because of reports of esophageal trauma, some authors recommend Gastrografin swallow or endoscopy after use of an esophageal obturator airway (EOA)-like device. Due to the established complication profile and the evolution of superior alternative devices, the use of esophageal tubes should be discouraged.
|
Patients intubated with an EOA in the field will need endotracheal intubation on arrival in the emergency department. If an ETC or King LT airway is in place, it may be used temporarily for continued resuscitation, but a premium should be placed in establishing a cuffed, endotracheal intubation.
The cuffed oropharyngeal airway is a modified oropharyngeal airway with a large distal inflatable cuff. It is inserted like a traditional oral airway, and the cuff is then inflated in the supraglottic space. This device is useful in resuscitation because of its ease of insertion and the low level of skill required to place it. The disadvantage of the device is that it has no distal balloon and gastric contents may be more easily aspirated as compared to the ETC.
1This chapter is a revision of the chapter by Julia Nathan, MD, from the 4th edition.
Principles of Intubation
These principles of intubation management apply to all methods of airway management described in this chapter. Airway positioning, suction, and administration of 100% oxygen must precede any attempt at advanced airway control. Keep protective gear with the airway equipment, and use it routinely.
Most patients can be intubated orally by direct laryngoscopic visualization of the cords. This is the method of choice, because the best assurance of correct tube placement is seeing the tube pass through the cords into the trachea. Please refer to Chapter 7 for complete discussion of basic laryngoscopy and orotracheal intubation technique.
When direct visualization is difficult (Table 10–4), various methods are available to improve visualization of the glottic opening. Backward, upward, rightward pressure (also known as the BURP maneuver) on the external larynx by an assistant to the intubator has been used with some success to increase the intubator’s view of the glottic opening. An old technique that has resurfaced for use in the last few years, called external laryngeal manipulation (ELM), is probably even more successful at obtaining a better look at the glottis. This maneuver requires the intubator to use a bimanual technique for intubation. While attempting to visualize the glottis with the laryngoscope in the left hand, by traditional means, the intubator reaches around the anterior neck with the right hand and manipulates the external larynx in all directions while attempting to find a position in which the glottis can be better visualized. Once this position is noted, an assistant continues to hold the external laryngeal structures in this position while the intubator then passes the ET tube through the cords.
A head-elevated laryngoscopy position has also been found to be successful in increasing the view of the glottic opening. In patients who do not require C-spine immobilization, elevating the head so that the laryngeal structures are roughly level with anterior chest wall can also dramatically improve visualization of the glottic opening. This can be fairly easily accomplished with blankets, towels, or other material placed under the patient’s head/neck, or by using the hand to help elevate the occiput. This maneuver is especially helpful in the obese patient with a large neck.
If the glottis is truly not visible after using these basic techniques, then other options are available. Blind intubation techniques, video laryngoscopy, fiberoptically assisted intubations, and surgical airways are all options in the difficult airway that cannot be intubated by direct means. These methods will be discussed in the next section.
Airway management presents many opportunities for exposure to patient secretions. Wear adequate protective clothing, including a gown, gloves, mask, and either a face shield or goggles, any time the airway is manipulated. When the intubator’s fingers are in the patient’s mouth (eg, digital intubation, lighted stylet), care must be taken to prevent bite wounds. Place a bite block or dental prod before initiating intubation. Alternatively, place several layers of gauze between the intubator’s hand and the patient’s teeth. If the patient wears dentures, remove them before airway manipulation.
After intubation, secure and assess the position of the ET by observing the chest wall for expansion. Auscultate both lung fields and the abdomen while ventilating. Inaudible lung sounds or the presence of abdominal sounds suggest esophageal placement. If breath sounds are louder on the right than on the left, suspect right mainstem intubation. Withdraw the tube 1–2 cm and auscultate again. Confirm the tube position by end-tidal CO2 detector and chest x-ray.
Nonsurgical Devices and Techniques for Managing the Difficult Airway
The laryngeal mask airway (LMA) is a device that has proven to be useful as an alternative for bag–valve–mask ventilation and as a rescue option in the difficult airway. The LMA is a semirigid tube with a distal inflatable balloon mask that is inserted blindly into the hypopharynx. The mask lies over the larynx and seals around the glottic opening. The LMA does not protect against aspiration. This device has been demonstrated to be easy to insert with limited prior training. The LMA is appropriate for use in adults and pediatrics, including neonates weighing more than 2 kg. The intubating LMA (I-LMA) is a modification of the LMA that has been developed to act as a conduit to allow blind passage of the ET through the glottis. The I-LMA has a metal handle attached to it that allows the user to stand at the head of a patient and manipulate it similarly to using laryngoscope handle in order to reposition the device and tube as needed.
Lighted stylet and light wand devices have been developed to aid in blind intubation. This method can be used when blood, secretions, or vomitus fill the hypopharynx. Because laryngoscopy need not be used, lighted stylets may be advantageous when the C-spine must remain immobilized. Blind intubation with a lighted stylet is most suitable for deeply comatose or apneic patients when there is little risk of stimulating protective reflexes or biting of the intubator’s hand. Use a bite block or dental prod for protection. A lighted stylet can also be combined with direct laryngoscopy. Although there are no absolute contraindications to this technique, ambient lighting must be low to maximize its benefit. Obesity may diminish the intensity of transillumination. As for other blind techniques, avoid this method when direct laryngoscopy can be performed.
If necessary, one person can perform this technique unaided. These devices have a battery-powered light source at the top of a semiflexible stylet. A longer, floppy stylet is available for nasal intubations. The stylet is threaded into an ET. Aside from the lighted stylet, no special equipment is required.
Form the assembly of stylet and ET into a hook of slightly greater than 90°. The patient may be approached from the head if laryngoscopy is used. Otherwise, approach the patient from the right shoulder. While placing gentle traction on the tongue, pass the assembly into the mouth. When the epiglottis is reached, use a scooping or ladling motion to place the tip into the glottis. The appearance of transillumination at the neck indicates the position of the tube. Tracheal placement results in a bright, well-circumscribed area of transillumination at the cricothyroid membrane. The ET can then be advanced over the stylet into the trachea. Transillumination lateral to the midline indicates piriform sinus placement and need for repositioning. Esophageal placement causes little or no transillumination. The procedure is essentially the same for nasal intubation with a lighted stylet.
This procedure shares the same complications as other blind techniques: inadvertent malpositioning of the tube, hypoxia, and tissue damage.
Over the last few years, video laryngoscopes have been added to the airway armamentarium that many emergency physicians have ready to assist in challenging airway problems. The video laryngoscope, as its name implies, is a device with a video camera situated at the end of a curved blade that allows visualization of the anterior aspect of the hypopharynx and glottis. Because of the curve of the device, visualization of the glottis occurs without out alignment of the oropharyngeal and laryngotracheal axes that is required for successful intubation using conventional direct laryngoscopy. These devices utilize indirect laryngoscopy and can be particularly useful in difficult airway patients including those airways complicated by large body habitus or limited neck mobility. Many emergency physicians now preferentially turn to one of these airway management tools when managing difficult airway patients. Similar to the limitations discussed below with fiberoptic laryngoscopy, video laryngoscopes are centered around conditions that can obscure the lens of the device such as excessive oropharyngeal secretions or blood in the hypopharynx. Suctioning the airway prior to the intubation attempt may improve the chance of a successful intubation using video laryngosopes.
Fiberoptic bronchoscopes may be used to locate the opening of the glottis when direct laryngoscopy cannot be used or is unsuccessful. The ET can then be advanced over the endoscope into the trachea. Although this procedure can be carried out without movement of the C-spine, it requires skill and practice. It can be performed either orally or nasally and oxygen can be insufflated during the procedure. It may be impossible when the hypopharynx is filled with blood or secretions. In addition, the equipment is expensive and easily damaged. Intubation via this method does require significant practice to become proficient.


